Color Splat Materials
More actions
Preface
If you want to be able to use tiled terrain textures across a mesh, rather than a single texture scaled across the entire surface (which won't really work for most terrains, given the size) then you'll want to use the Splat shader. This allows you to upload a "splat map" which tells the shader where and how much to apply each of your tiled textures across the surface of your mesh. The splat map can contain information on up to 4 different textures which will be used across your meshes surface.
Splat Map Users
- Component:TextureCharacterControllerModifier
- Component:PBS ColorSplatMetallic
- Component:PBS ColorSplatSpecular
- Component:FootstepSoundSplatmapSplitter
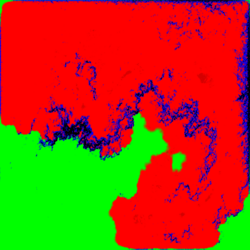
A typical splat map will look something like this, although it may also look mostly transparent with only lines visible where rough terrain edges are.
Each color represents a different terrain texture. In this example green is sand, red is grass, blue is rock and transparency (or black) is a second type of rock.
This is not simply a flat image though, in fact it is 4 greyscale images composed into one, using the RGBA channels of the image to store each texture's mapping. Here are each of those layers split so you can see them individually...
The free image editor GIMP can do everything required here, so don't worry if you haven't got Photoshop or similar.
What You Need
To use this shader, you will need:
- Your splat map layers.
- 1-4 terrain textures.
- (optionally, but highly recommended) The normal maps for those terrain textures.
The terrain textures should be your usual 1024 to 8192 resolution tileable landscape textures as they will be tiled over the entire mesh. You can set the tiling frequency, but only as a whole, not for each texture individually. You may want to take that into consideration and pre-tile your textures accordingly, for example if you want the grass texture to be twice as dense as the rock texture and all your textures are 2048 resolution, tile the grass texture to 4096 first, this will result in the grass texture being twice as dense when applied to the mesh.
Creating the Splat Map
If you already have your RGBA Splat Map precomposed then you can skip this section. Otherwise...
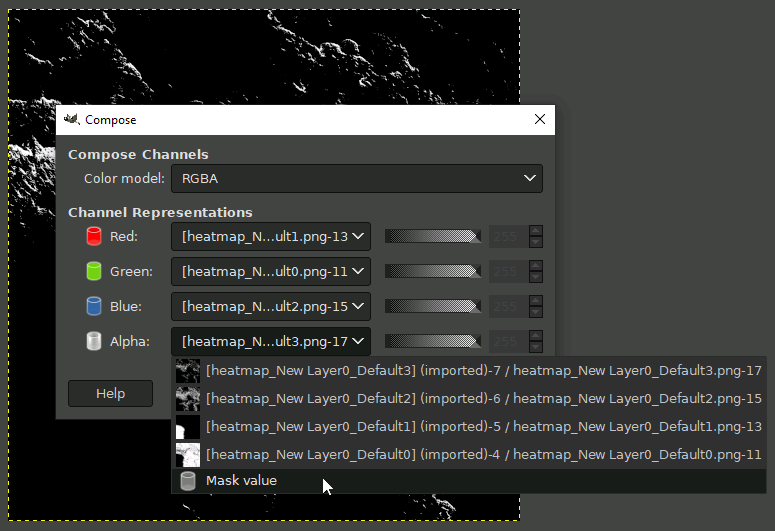
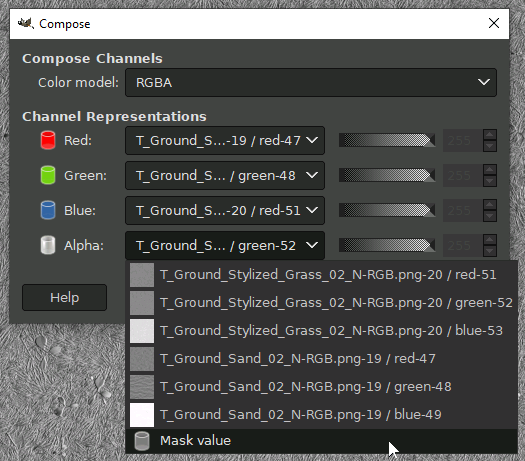
First, take your terrain heatmaps and convert them to grayscale. These maps are created by whatever software you're using to generate the terrain in the first place, e.g. World Creator, World Designer, etc. Once this is done, use your image editor of choice's "Compose" function to convert the terrain maps into a single RGBA image. Try and keep the ordering sane here as it will matter later. I recommend going by lowest to highest in terms of altitude, for example: sand, grass, rock, mountain, etc. This should create an image that looks much like the red/green/blue one above, or a mostly transparent image where only some harsh lines are visible. The composition dialogue should look something like this...
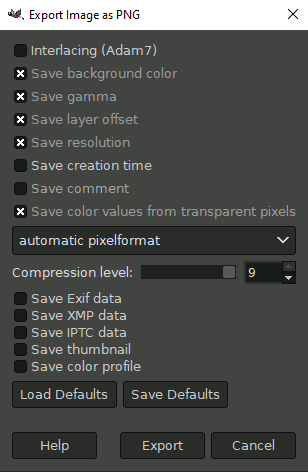
When saving images, you must ensure that transparent pixels retain their colors, otherwise the splat map may initially look correct, but it won't work correctly. You can find this option halfway down the PNG save dialogue window in GIMP for example.
Creating the Normal Maps
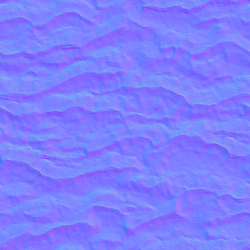
Normal maps are packed by pairs in this shader, so unfortunately you cannot simply load in your existing terrain normal maps as-is. If your map looks like this, then it's still a standard normal map and needs to be converted.
The basic process here is decomposing your existing normal maps, using the first two parts (Red and Green) channels from the decomposed normal maps and then composing a new image using the Red and Green channels from two terrain textures, into the RGBA channels of a new image (RG from the first one, BA from the second).
So first, take the normal map for your first terrain texture and RGB Decompose it. You should be left with 3 layers. Red and Green will have clear images to them, Blue will probably be all white or black. That's fine as we're only using the first two, the Red and Green channels. Repeat this process for each of your terrain's normal maps. You will get something like this for each of the decomposed normal maps.
Now we need to combine the 4 normal maps we have into the 2 new normal maps the shader needs. This must be done in the same order as you used for your splat map layout. So if you have the order Sand, Grass, Stone, Rock in your splat map, then your paired normal maps should be, in order: Sand/Grass, Stone/Rock.
To combine your normal maps, use your image editor's RGBA Compose function again and select the Red channel from the first normal map as the new Red channel. Select the Green channel from the first normal map to use as the Green channel. Now select the Red channel from your second normal map to use as the new image's Blue channel, and the second normal map's Green channel as the new image's transparency/alpha channel. The composition process should look something like this.
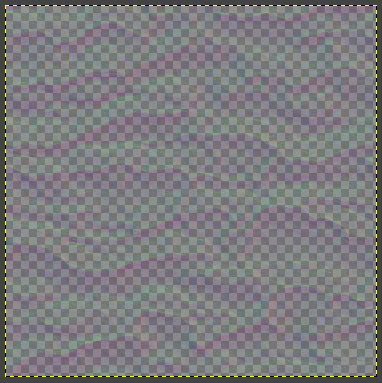
Each finalized composed "dual" normal map should look something like the image below.
You're now ready to bring them into Resonite.
Getting Ready to Import
Now that you've pre-processed your maps and images, you should be pretty much done for all external work. By this point, you should have:
- Your composed splat map.
- Your terrain mesh.
- 4 tileable terrain textures.
- 2 merged normal maps.
If you have all of the above then you're ready to go, import into Resonite and move onto the next stage.
Assigning the Material Components
This section assumes some level of general familiarity with Resonite materials.
Upload your mesh, the splat map, your terrain textures and the normal maps as per the usual upload method. Then change the material on the mesh to use the "PBR Splat Map" shader and bring up the inspector for the material. Most of the slots should be fairly obvious from here. The top texture slot is for your splat map, so drop that in. Ignore the second height map slot. Then drop your 4 terrain textures into the 4 respective albedo texture slots, in the correct order (e.g. Sand, Grass, etc.). At this point you should have noticed your mesh looking correct. Lastly, drop in the two normal maps into the two normal map slots, again following the order you've used above.
If your terrain textures look stretched (which they almost certainly will) then scroll back to the top of the window and increase the tiling on both axis until it achieves the desired look. You can also increase or decrease the amount of effect the normal maps have by changing their values below the two textures that you dropped in. Despite the fact you only have two normal maps, you can adjust the strength of each normal individually for all 4 textures.
If the textures seem to be applied, but in the wrong locations, the splat map may be rotated compared to the mesh. Bring out the splat map from the shader material and use the rotation and/or flip options to adjust it until it matches up.
Results
You should now find that your textures are all applied in the correct locations, across the full size of your mesh, regardless of how big that mesh may be. Below you'll find an example of a 2KM map with a single 8192 splat map applied to it.
