Created page with "레소나이트 데스크톱 빌드는 여러 명령줄 인자를 지원합니다. 이러한 인자의 대부분은 레소나이트 런처를 사용할떼, 보다 시각적인 방식으로 설정할 수 있고, 여러가지 실행 설정을 지정해 관리할 수 있습니다." |
No edit summary |
||
| (26 intermediate revisions by 2 users not shown) | |||
| Line 2: | Line 2: | ||
레소나이트 데스크톱 빌드는 여러 명령줄 인자를 지원합니다. 이러한 인자의 대부분은 레소나이트 런처를 사용할떼, 보다 시각적인 방식으로 설정할 수 있고, 여러가지 실행 설정을 지정해 관리할 수 있습니다. | 레소나이트 데스크톱 빌드는 여러 명령줄 인자를 지원합니다. 이러한 인자의 대부분은 레소나이트 런처를 사용할떼, 보다 시각적인 방식으로 설정할 수 있고, 여러가지 실행 설정을 지정해 관리할 수 있습니다. | ||
이러한 명령행 인자는 [[Standalone Experiences|독립형 체험]]을 설정할 때 유용할 수 있습니다. | |||
== 특정 하드웨어 강제 적용 == | |||
<!--T:3--> | <!--T:3--> | ||
* '' | * ''없음'' - 자동 감지 | ||
* '''-SteamVR''' - | * '''-SteamVR''' - SteamVR 모드 | ||
* '''-RiftTouch''' - | * '''-RiftTouch''' - 오큘러스 리프트 및 터치 컨트롤러 모드 | ||
* '''-Screen''' | * '''-Screen''' - 데스크톱 모드 | ||
* '''-Screen360''' - | * '''-Screen360''' - 360 등장방형 렌더링 데스크톱 모드 | ||
* '''-StaticCamera''' - | * '''-StaticCamera''' - 비-상호작용 카메라 모드 | ||
* '''-StaticCamera360''' - | * '''-StaticCamera360''' - 360 등장방형 렌더링을 사용하는 비-상호작용 카메라 모드 | ||
* '''-MixedRealityCamera''' - | * '''-MixedRealityCamera''' - 혼합 현실 렌더링을 사용하는 비-상호작용 카메라 모드 | ||
* '''-LegacySteamVRInput''' - | * '''-LegacySteamVRInput''' - 기존 Steam VR 입력 처리 강제. 오큘러스 퀘스트에 사용되는 Virtual Desktop과 같이 손 골격 모델이 없거나 잘못된 일부 Steam VR 기기에 대한 해결 방법으로 사용됩니다. | ||
* '''-ForceSRAnipal''' - | * '''-ForceSRAnipal''' - Vive Pro Eye가 없는 경우에도 HTC 눈 및 입술 트래킹을 위해 SR Anipal SDK를 강제로 초기화합니다. | ||
* '''-LegacyScreen''' - | * '''-LegacyScreen''' - Resonite가 이전 데스크톱 "디버깅" 모드에서 강제로 실행되도록 합니다. | ||
* '''-EnableOWO ''Insert_ip_address_here''''' - | * '''-EnableOWO ''Insert_ip_address_here''''' - [https://owogame.com/ OWO 게임 햅틱 조끼] 연동을 활성화하며, 조끼의 IP 주소를 입력해야 합니다. 현재 작동하지 않으니 관련 [https://github.com/Yellow-Dog-Man/Resonite-Issues/issues/186 Github 이슈]를 참조하세요. | ||
== 세션 참여 / 월드 열기 == | |||
<!--T:5--> | <!--T:5--> | ||
* '''-Join Auto''' - | * '''-Join Auto''' - LAN에서 활성 세션에 자동으로 참여 (현재 사용자가 가장 많은 세계로 이동됨) | ||
* '''-Join '' | * '''-Join ''URL_또는_IP:포트를_입력''''' - 지정된 URi에서 세션에 참여 (Resonite-session | lnl) | ||
* '''-Open '' | * '''-Open ''URL을_입력''''' - 시작 시 주어진 URL에서 월드 열기 (resrec) | ||
* '''-Scratchspace '' | * '''-Scratchspace ''포트를_입력''''' - 지정된 포트에서 새 스크래치 스페이스 월드를 시작합니다(레거시, 제거될 가능성이 높음). | ||
* '''-AnnounceHomeOnLAN''' - | * '''-AnnounceHomeOnLAN''' - 홈과 [[Userspace|사용자 공간]]은 기본적으로 LAN에서 액세스할 수 있습니다. | ||
* '''-Bootstrap '' | * '''-Bootstrap ''부트스트랩_클래스를_입력''''' - 지정된 이름의 클래스에서 사용자 정의 [[Bootstrapping|부트스트랩]] 함수를 실행합니다. | ||
== 네트워킹 == | |||
<!--T:35--> | <!--T:35--> | ||
* '''-ForceLANOnly''' - | * '''-ForceLANOnly''' - 모든 월드는 기본적으로 LAN 네트워크에서만 공개되며 인터넷에서는 액세스할 수 없습니다 | ||
* '''-UseLocalCloud''' - 로컬 클라우드 API 서버 사용 - 주로 디버깅에 사용 | |||
* '''-UseLocalCloud''' - | * '''-UseStagingCloud''' - 스테이징 API 서버 사용 - 주로 디버깅에 사용 | ||
* '''-UseStagingCloud''' - | |||
== 드론 카메라 프리셋 == | |||
특정 움직임 프리셋을 사용하여 드론 스크립트로 정적 카메라를 초기화합니다. | |||
<!--T:8--> | <!--T:8--> | ||
| Line 54: | Line 49: | ||
<!--T:39--> | <!--T:39--> | ||
드론 카메라에 사용할 수 있는 인수입니다. | |||
* '''-UseResoniteCamera''' - | * '''-UseResoniteCamera''' - 스태틱 카메라를 줌 컨트롤, 프리뷰 및 기타 기능을 갖춘 레소나이트 카메라로 스폰합니다. | ||
== 아바타 관련 옵션 == | |||
* '''-ForceNoVoice''' - | * '''-ForceNoVoice''' - CommonAvatarBuilder가 음성기능을 사용할 수 없도록 처리.(현실에서 프리젠테이션을 진행할 경우 사용) | ||
== 데이터 폴더 == | |||
레소나이트에는 여러 개의 [[Resonite Data Folders|데이터 폴더]]가 있으며, 여기에는 다양한 명령줄 인수를 통해 제어할 수 있습니다: | |||
<!--T:43--> | <!--T:43--> | ||
* | * 데이터 폴더를 다른 위치로 옮기려면 [[Relocate Resonite Folders | 명령줄 인자]]를 사용하면 됩니다. | ||
== 로그 폴더 == | |||
* '''-LogsPath''' '' | * '''-LogsPath''' ''C:\지정된\경로'' - 로그 파일을 사용자 지정 경로에 저장하도록 리디렉션합니다. | ||
== 동기화 관련 문제 == | |||
* | * 동기화 문제가 발생하면 명령줄 인수를 사용하여 동기화 문제를 해결하는 방법에 대한 다양한 가이드가 있는 [[Sync Errors|동기화 오류]] 문서를 참조하세요. | ||
== 데이터베이스 복구 == | |||
* | * 데이터베이스 문제가 있는 경우 [[Database repair|데이터베이스 복구]] 문서에서 명령줄 인수를 사용하여 문제를 해결하는 방법을 안내합니다. | ||
== 포스트 프로세싱 == | |||
* '''-ctaa''' - | * '''-ctaa''' - Cinematic Temporal Anti-Aliasing 활성화 | ||
* '''-ctaaTemporalEdgePower '' | * '''-ctaaTemporalEdgePower ''번호_입력''''' - ctaa TemporalEdgePower 설정. | ||
* '''-ctaaSharpnessEnabled '' | * '''-ctaaSharpnessEnabled ''True_또는_False를_입력''''' - ctaa의 Sharpness 설정. | ||
* '''-ctaaAptiveSharpness '' | * '''-ctaaAptiveSharpness ''번호_입력''''' - ctaa의 ctaaAdaptiveSharpness 적용치. | ||
== 기타 == | |||
* '''-Watchdog '' | * '''-Watchdog ''파일경로를_입력''''' - Resonite는 주기적으로 현재 시간을 지정된 파일에 기록합니다. 이는 프로세스가 멈췄을 때 다시 시작하는 데 사용할 수 있습니다. | ||
* '''-LoadAssembly '' | * '''-LoadAssembly ''경로를_입력''''' - 프로세스에 추가 CLR 어셈블리를 로드합니다. | ||
* '''-Kiosk''' - | * '''-Kiosk''' - [[Kiosk Mode|키오스크 모드]]에서 실행(로고, 월드 스위쳐등과 같은 [[Userspace|사용자 공간]] 항목을 숨기고 게스트의 순간 이동을 기본으로 비활성화합니다). | ||
* '''-NoUI''' - | * '''-NoUI''' - [[Userspace|사용자 공간]] UI를 숨깁니다. | ||
* '''-CubemapResolution '' | * '''-CubemapResolution ''해상도를_입력''''' - 360도 등장방형 렌더링을 강제로 지정된 해상도의 cubemap으로 반영 | ||
* '''-DoNotAutoLoadHome''' - | * '''-DoNotAutoLoadHome''' - 시작 시 클라우드 홈이 자동으로 로드되지 않습니다(수동으로 로드 가능). | ||
* '''-ResetDash''' - | * '''-ResetDash''' - 대시보드의 레이아웃을 기본 구성으로 초기화합니다. | ||
* '''-SkipIntroTutorial''' - | * '''-SkipIntroTutorial''' - 시작시 자습서가 시작되지 않도록 합니다. | ||
* '''-Forceintrotutorial''' - | * '''-Forceintrotutorial''' - 강제로 시작시 자습서를 실행시킵니다. | ||
* '''-Invisible''' - | * '''-Invisible''' - 로그인 시 온라인 상태가 표시되지 않도록 설정합니다. | ||
* '''-EngineConfig '' | * '''-EngineConfig ''파일경로를_입력''''' - 커스텀 [[Startup Config File|구성 파일]]을 지정합니다. | ||
* '''-BackgroundWorkers '' | * '''-BackgroundWorkers ''번호_입력''''' - 백그라운드 작업자 프로세스 수를 재정의합니다. '''경고:''' 꼭 필요한 경우가 아니면 이 기능을 사용하지 마세요. | ||
* '''-PriorityWorkers '' | * '''-PriorityWorkers ''번호_입력''''' - 우선순위 작업자 프로세스 수를 재정의합니다. '''경고:''' 꼭 필요한 경우가 아니면 이 기능을 사용하지 마세요! | ||
* '''-ForceReticleAboveHorizon''' - | * '''-ForceReticleAboveHorizon''' - 기본설정을 1인칭 시점의 데스크톱에서 지평선 아래를 볼 수 없도록 합니다. | ||
== Resonite 사용자 지정 프로토콜 핸들러(Steam 전용) == | |||
레소나이트는 설치 시 사용자 지정 프로토콜 핸들러를 컴퓨터에 등록합니다. 이를 사용하여 링크를 클릭하면 설정된 위치나 월드에 레소나이트가 열리도록 링크를 생성할 수 있습니다. 이러한 인수는 레소나이트 런처에 전달되며, 런처는 레소나이트가 시작되고 실행 중인지 확인하고 실행 중인 인스턴스로 전달합니다. | |||
<!--T:13--> | <!--T:13--> | ||
* '''Resonite:?world='' | * '''Resonite:?world=''URL을_입력''''' - 지정된 URL에서 월드 또는 세션 열기 | ||
** | ** 예를 들어 '''Resonite:?world=resrec:///U-ProbablePrime/R-9ce872e1-ffb8-4194-bb91-3d3ab5f157a1''' - ProbablePrime의 "The Directory"를 엽니다. | ||
** | ** 그리고 '''Resonite:?world=Resonite-session://eea1442e-0ff2-4d6a-ad16-2dac9ea786fc'''는 세션 eea1442e-0ff2-4d6a-ad16-2dac9ea786fc에 참여합니다. | ||
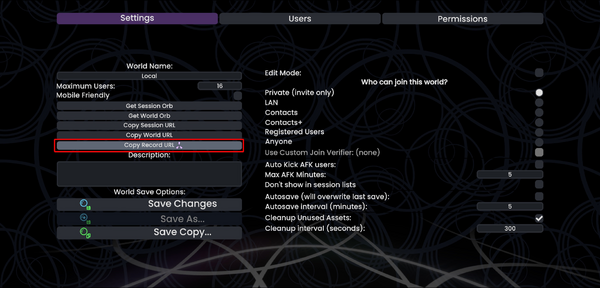
월드 오브에 대한 인스펙터를 열고 월드 오브 컴포넌트로 이동하거나 세션 메뉴의 '참조 경로(Record URL) 복사' 버튼을 사용하여 월드의 URL에 액세스할 수 있습니다: | |||
[[File:CopyRecordUrlButton.png|600px|'세션' 탭의 대시보드에서 '설정' 버튼을 선택하고 '참조 경로(Record URL) 복사' 버튼이 강조 표시된 상태]] | |||
[[File:CopyRecordUrlButton.png|600px| | |||
URL 필드를 더블클릭하여 선택할 수 있습니다. URL 텍스트는 Ctrl+C를 사용하여 Windows 클립보드에 복사할 수 있습니다. | |||
클릭 가능한 프로토콜 핸들러를 제한하는 플랫폼에서 월드에 링크하는 경우 '''<nowiki>https://api.resonite.com/open/</nowiki>'''에 있는 리디렉션을 대신 사용할 수 있습니다. 위의 'Resonite:' 프로토콜 핸들러를 사용하도록 리디렉션됩니다. | |||
< | <!--T:37--> | ||
* '''https://api.resonite.com/open/world/'' | * '''<nowiki>https://api.resonite.com/open/world/</nowiki>''ID를_입력''''' - 지정된 URL에서 월드 열기 | ||
** | ** 예를 들어 '''https://api.resonite.com/open/world/U-ProbablePrime/R-9ce872e1-ffb8-4194-bb91-3d3ab5f157a1''' - ProbablePrime의 "The Directory"를 엽니다. | ||
< | <!--T:38--> | ||
* '''https://api.resonite.com/open/session/'' | * '''<nowiki>https://api.resonite.com/open/session/</nowiki>''ID를_입력''''' - 지정된 URL에서 세션 열기 | ||
** | ** 예를 들어 '''https://api.resonite.com/open/session/S-eea1442e-0ff2-4d6a-ad16-2dac9ea786fc'''는 S-eea1442e-0ff2-4d6a-ad16-2dac9ea786fc 세션에 참여합니다. | ||
== 유니티 커멘드라인 옵션 == | |||
<!--T:15--> | <!--T:15--> | ||
[https://docs.unity3d.com/Manual/CommandLineArguments.html Unity 스탠드얼론 플레이어 명령줄 인수]는 특정 해상도 또는 창 모드를 설정하는 데 유용합니다. | |||
* '''-screen-fullscreen 0''' - | * '''-screen-fullscreen 0''' - 윈도우 모드로 실행 | ||
* '''-screen-fullscreen 1''' - | * '''-screen-fullscreen 1''' - 전체 화면으로 실행 | ||
* '''-screen-width''' - | * '''-screen-width''' - 수평해상도 지정 | ||
* '''-screen-height''' - | * '''-screen-height''' - 수직해상도 지정 | ||
예: <code>-screen-fullscreen 0 -screen-width 1280 -screen-height 720</code>를 사용하는 경우 1280x720 크기의 창모드에서 실행됩니다. | |||
== 명령줄 인자를 사용하는 방법 == | |||
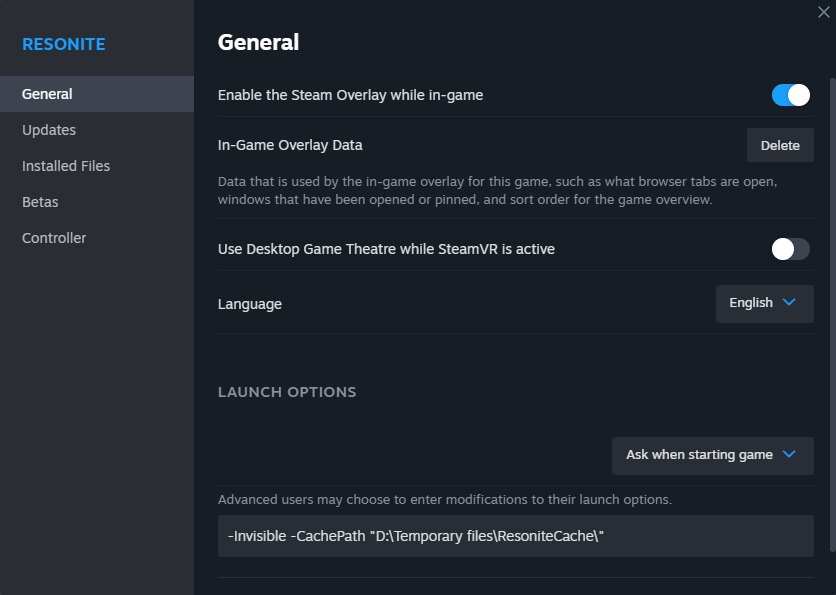
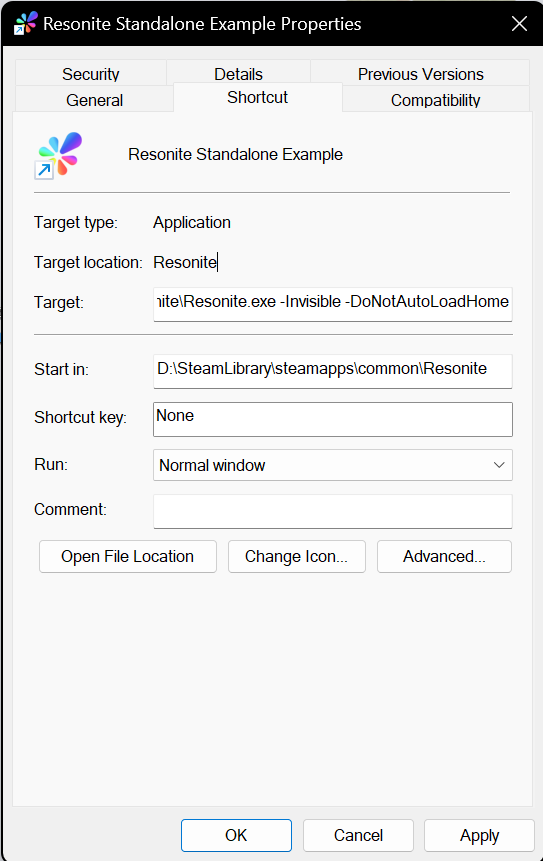
다음은 기본이 아닌 명령줄 인수를 사용하여 레소나이트를 시작하는 세 가지 방법입니다. 각 예에서는 '''-Invisible''' 및 '''-CachePath ''경로를_입력''''' 명령을 결합하는 방법을 설명합니다. 다음 예시에서는 <code>D:\Temporary files\ResoniteCache\</code>에서 기본이 아닌 위치를 지정하는 방법을 보여줍니다. '''이 작업을 수행할 필요가 없으면 이 예시를 복사하지 마십시오!''' 사용할 가장 좋은 방법을 선택하는 것은 일반적으로 Resonite를 시작하는 방법에 따라 다릅니다. 대부분의 사용자에게는 [[#Steam에서_시작하는_법]]에 설명된 설정이 최선의 선택일 것입니다. | |||
=== Steam에서 시작하는 법 === | |||
{{SteamCommandLineArguments}} | |||
=== 스텐드얼론 빌드에서 사용하는 방법 === | |||
{{StandaloneCommandLineArguments}} | |||
Latest revision as of 16:33, 13 May 2024
레소나이트 데스크톱 빌드는 여러 명령줄 인자를 지원합니다. 이러한 인자의 대부분은 레소나이트 런처를 사용할떼, 보다 시각적인 방식으로 설정할 수 있고, 여러가지 실행 설정을 지정해 관리할 수 있습니다.
이러한 명령행 인자는 독립형 체험을 설정할 때 유용할 수 있습니다.
특정 하드웨어 강제 적용
- 없음 - 자동 감지
- -SteamVR - SteamVR 모드
- -RiftTouch - 오큘러스 리프트 및 터치 컨트롤러 모드
- -Screen - 데스크톱 모드
- -Screen360 - 360 등장방형 렌더링 데스크톱 모드
- -StaticCamera - 비-상호작용 카메라 모드
- -StaticCamera360 - 360 등장방형 렌더링을 사용하는 비-상호작용 카메라 모드
- -MixedRealityCamera - 혼합 현실 렌더링을 사용하는 비-상호작용 카메라 모드
- -LegacySteamVRInput - 기존 Steam VR 입력 처리 강제. 오큘러스 퀘스트에 사용되는 Virtual Desktop과 같이 손 골격 모델이 없거나 잘못된 일부 Steam VR 기기에 대한 해결 방법으로 사용됩니다.
- -ForceSRAnipal - Vive Pro Eye가 없는 경우에도 HTC 눈 및 입술 트래킹을 위해 SR Anipal SDK를 강제로 초기화합니다.
- -LegacyScreen - Resonite가 이전 데스크톱 "디버깅" 모드에서 강제로 실행되도록 합니다.
- -EnableOWO Insert_ip_address_here - OWO 게임 햅틱 조끼 연동을 활성화하며, 조끼의 IP 주소를 입력해야 합니다. 현재 작동하지 않으니 관련 Github 이슈를 참조하세요.
세션 참여 / 월드 열기
- -Join Auto - LAN에서 활성 세션에 자동으로 참여 (현재 사용자가 가장 많은 세계로 이동됨)
- -Join URL_또는_IP:포트를_입력 - 지정된 URi에서 세션에 참여 (Resonite-session | lnl)
- -Open URL을_입력 - 시작 시 주어진 URL에서 월드 열기 (resrec)
- -Scratchspace 포트를_입력 - 지정된 포트에서 새 스크래치 스페이스 월드를 시작합니다(레거시, 제거될 가능성이 높음).
- -AnnounceHomeOnLAN - 홈과 사용자 공간은 기본적으로 LAN에서 액세스할 수 있습니다.
- -Bootstrap 부트스트랩_클래스를_입력 - 지정된 이름의 클래스에서 사용자 정의 부트스트랩 함수를 실행합니다.
네트워킹
- -ForceLANOnly - 모든 월드는 기본적으로 LAN 네트워크에서만 공개되며 인터넷에서는 액세스할 수 없습니다
- -UseLocalCloud - 로컬 클라우드 API 서버 사용 - 주로 디버깅에 사용
- -UseStagingCloud - 스테이징 API 서버 사용 - 주로 디버깅에 사용
드론 카메라 프리셋
특정 움직임 프리셋을 사용하여 드론 스크립트로 정적 카메라를 초기화합니다.
- -CameraBiggestGroup
- -CameraTimelapse
- -CameraStayBehind
- -CameraStayInFront
드론 카메라에 사용할 수 있는 인수입니다.
- -UseResoniteCamera - 스태틱 카메라를 줌 컨트롤, 프리뷰 및 기타 기능을 갖춘 레소나이트 카메라로 스폰합니다.
아바타 관련 옵션
- -ForceNoVoice - CommonAvatarBuilder가 음성기능을 사용할 수 없도록 처리.(현실에서 프리젠테이션을 진행할 경우 사용)
데이터 폴더
레소나이트에는 여러 개의 데이터 폴더가 있으며, 여기에는 다양한 명령줄 인수를 통해 제어할 수 있습니다:
- 데이터 폴더를 다른 위치로 옮기려면 명령줄 인자를 사용하면 됩니다.
로그 폴더
- -LogsPath C:\지정된\경로 - 로그 파일을 사용자 지정 경로에 저장하도록 리디렉션합니다.
동기화 관련 문제
- 동기화 문제가 발생하면 명령줄 인수를 사용하여 동기화 문제를 해결하는 방법에 대한 다양한 가이드가 있는 동기화 오류 문서를 참조하세요.
데이터베이스 복구
- 데이터베이스 문제가 있는 경우 데이터베이스 복구 문서에서 명령줄 인수를 사용하여 문제를 해결하는 방법을 안내합니다.
포스트 프로세싱
- -ctaa - Cinematic Temporal Anti-Aliasing 활성화
- -ctaaTemporalEdgePower 번호_입력 - ctaa TemporalEdgePower 설정.
- -ctaaSharpnessEnabled True_또는_False를_입력 - ctaa의 Sharpness 설정.
- -ctaaAptiveSharpness 번호_입력 - ctaa의 ctaaAdaptiveSharpness 적용치.
기타
- -Watchdog 파일경로를_입력 - Resonite는 주기적으로 현재 시간을 지정된 파일에 기록합니다. 이는 프로세스가 멈췄을 때 다시 시작하는 데 사용할 수 있습니다.
- -LoadAssembly 경로를_입력 - 프로세스에 추가 CLR 어셈블리를 로드합니다.
- -Kiosk - 키오스크 모드에서 실행(로고, 월드 스위쳐등과 같은 사용자 공간 항목을 숨기고 게스트의 순간 이동을 기본으로 비활성화합니다).
- -NoUI - 사용자 공간 UI를 숨깁니다.
- -CubemapResolution 해상도를_입력 - 360도 등장방형 렌더링을 강제로 지정된 해상도의 cubemap으로 반영
- -DoNotAutoLoadHome - 시작 시 클라우드 홈이 자동으로 로드되지 않습니다(수동으로 로드 가능).
- -ResetDash - 대시보드의 레이아웃을 기본 구성으로 초기화합니다.
- -SkipIntroTutorial - 시작시 자습서가 시작되지 않도록 합니다.
- -Forceintrotutorial - 강제로 시작시 자습서를 실행시킵니다.
- -Invisible - 로그인 시 온라인 상태가 표시되지 않도록 설정합니다.
- -EngineConfig 파일경로를_입력 - 커스텀 구성 파일을 지정합니다.
- -BackgroundWorkers 번호_입력 - 백그라운드 작업자 프로세스 수를 재정의합니다. 경고: 꼭 필요한 경우가 아니면 이 기능을 사용하지 마세요.
- -PriorityWorkers 번호_입력 - 우선순위 작업자 프로세스 수를 재정의합니다. 경고: 꼭 필요한 경우가 아니면 이 기능을 사용하지 마세요!
- -ForceReticleAboveHorizon - 기본설정을 1인칭 시점의 데스크톱에서 지평선 아래를 볼 수 없도록 합니다.
Resonite 사용자 지정 프로토콜 핸들러(Steam 전용)
레소나이트는 설치 시 사용자 지정 프로토콜 핸들러를 컴퓨터에 등록합니다. 이를 사용하여 링크를 클릭하면 설정된 위치나 월드에 레소나이트가 열리도록 링크를 생성할 수 있습니다. 이러한 인수는 레소나이트 런처에 전달되며, 런처는 레소나이트가 시작되고 실행 중인지 확인하고 실행 중인 인스턴스로 전달합니다.
- Resonite:?world=URL을_입력 - 지정된 URL에서 월드 또는 세션 열기
- 예를 들어 Resonite:?world=resrec:///U-ProbablePrime/R-9ce872e1-ffb8-4194-bb91-3d3ab5f157a1 - ProbablePrime의 "The Directory"를 엽니다.
- 그리고 Resonite:?world=Resonite-session://eea1442e-0ff2-4d6a-ad16-2dac9ea786fc는 세션 eea1442e-0ff2-4d6a-ad16-2dac9ea786fc에 참여합니다.
월드 오브에 대한 인스펙터를 열고 월드 오브 컴포넌트로 이동하거나 세션 메뉴의 '참조 경로(Record URL) 복사' 버튼을 사용하여 월드의 URL에 액세스할 수 있습니다:
URL 필드를 더블클릭하여 선택할 수 있습니다. URL 텍스트는 Ctrl+C를 사용하여 Windows 클립보드에 복사할 수 있습니다.
클릭 가능한 프로토콜 핸들러를 제한하는 플랫폼에서 월드에 링크하는 경우 https://api.resonite.com/open/에 있는 리디렉션을 대신 사용할 수 있습니다. 위의 'Resonite:' 프로토콜 핸들러를 사용하도록 리디렉션됩니다.
- https://api.resonite.com/open/world/ID를_입력 - 지정된 URL에서 월드 열기
- 예를 들어 https://api.resonite.com/open/world/U-ProbablePrime/R-9ce872e1-ffb8-4194-bb91-3d3ab5f157a1 - ProbablePrime의 "The Directory"를 엽니다.
- https://api.resonite.com/open/session/ID를_입력 - 지정된 URL에서 세션 열기
- 예를 들어 https://api.resonite.com/open/session/S-eea1442e-0ff2-4d6a-ad16-2dac9ea786fc는 S-eea1442e-0ff2-4d6a-ad16-2dac9ea786fc 세션에 참여합니다.
유니티 커멘드라인 옵션
Unity 스탠드얼론 플레이어 명령줄 인수는 특정 해상도 또는 창 모드를 설정하는 데 유용합니다.
- -screen-fullscreen 0 - 윈도우 모드로 실행
- -screen-fullscreen 1 - 전체 화면으로 실행
- -screen-width - 수평해상도 지정
- -screen-height - 수직해상도 지정
예: -screen-fullscreen 0 -screen-width 1280 -screen-height 720를 사용하는 경우 1280x720 크기의 창모드에서 실행됩니다.
명령줄 인자를 사용하는 방법
다음은 기본이 아닌 명령줄 인수를 사용하여 레소나이트를 시작하는 세 가지 방법입니다. 각 예에서는 -Invisible 및 -CachePath 경로를_입력 명령을 결합하는 방법을 설명합니다. 다음 예시에서는 D:\Temporary files\ResoniteCache\에서 기본이 아닌 위치를 지정하는 방법을 보여줍니다. 이 작업을 수행할 필요가 없으면 이 예시를 복사하지 마십시오! 사용할 가장 좋은 방법을 선택하는 것은 일반적으로 Resonite를 시작하는 방법에 따라 다릅니다. 대부분의 사용자에게는 #Steam에서_시작하는_법에 설명된 설정이 최선의 선택일 것입니다.
Steam에서 시작하는 법
- Open Steam
- Right click on Resonite in your library
- Select "Properties" and then "Set Launch Options".
- Enter the command you need to use, exactly as it appears above and Run Resonite.
Now, if Resonite is launched via Steam, the custom command line arguments will take effect.
Commands entered via this method will not take effect if Resonite is launched any other way, such as directly launching the Resonite.exe.
스텐드얼론 빌드에서 사용하는 방법
Use a shortcut
It is possible to use launch commands via a custom shortcut targeting the Resonite.exe file.
To create a shortcut:
- Find the Resonite install folder and right-click on the Resonite.exe.
- In the context menu click 'Create Shortcut'
- Move the 'Resonite.exe - Shortcut' file to somewhere more convenient (such as the Desktop).
- Right-click on the shortcut file and click 'Properties' in the context menu.
- This opens a dialog window. Select the 'Shortcut' tab.
- In the 'Target' text box add a space after the Resonite.exe filepath and then add your command line arguments.
- Click 'Apply' and 'OK'.
Now, if Resonite is launched by double clicking on the shortcut it will launch using the custom options. These will not be applied if a different method is used to start Resonite.


