Added this page to the tutorial category. Updated an image description. |
Updated the tutorial. |
||
| Line 27: | Line 27: | ||
## For the <code>URL</code>, place your item's resdb link here. | ## For the <code>URL</code>, place your item's resdb link here. | ||
# Attach the [[Component:FileMetadata|FileMetadata]] component. | # Attach the [[Component:FileMetadata|FileMetadata]] component. | ||
## For the <code>Filename</code>, you can use any name here, but it must have the <code>.brson</code> file extension at the end of the name. | ## For the <code>Filename</code>, you can use any name here, but it must have the <code>.brson</code>, <code>.7zbson</code>, or <code>.lz4bson</code> file extension at the end of the name. | ||
## For the <code>MIME</code>, just use the <code>.brson</code> file extension here. | ## For the <code>MIME</code>, just use the <code>.brson</code>, <code>.7zbson</code>, or <code>.lz4bson</code> file extension here. (Matching the filename extension) | ||
# Open the [[Component:FileMetadata|FileMetadata]] Sync Methods using the Show Delegates mod, and with the [[ProtoFlux Tool]], grab and hold the <code>OnImportFile</code> method. Then open the context menu while still holding it, select <code>Proxy</code>. | # Open the [[Component:FileMetadata|FileMetadata]] Sync Methods using the Show Delegates mod, and with the [[ProtoFlux Tool]], grab and hold the <code>OnImportFile</code> method. Then open the context menu while still holding it, select <code>Proxy</code>. | ||
Revision as of 14:47, 13 July 2024
This tutorial will serve as a quick guide to unofficially cloud spawn items from a user's Inventory, and is also designed to get you started immediately, in a step by step process.
What You Need
- The mods Show Delegates from Arti & GetItemLink. For information on modding Resonite, see Mods.
- One Slot to hold components.
- Components StaticBinary & FileMetadata.
- The target item you want to spawn from the Inventory.
Setup
This is surprisingly simple to setup, here is how you would do it.
Item Setup

- Open the Inventory tab on the Dash.
- Navigate to the item you want to cloud spawn.
- Use the Get Item Link mod to get the resdb link (the cheese button).
Slot Setup

- Create an empty slot using the Dev Tool.
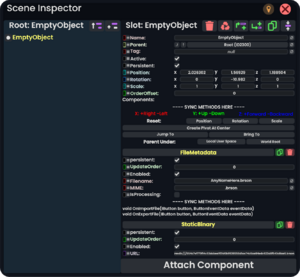
- Attach the StaticBinary component.
- For the
URL, place your item's resdb link here.
- For the
- Attach the FileMetadata component.
- For the
Filename, you can use any name here, but it must have the.brson,.7zbson, or.lz4bsonfile extension at the end of the name. - For the
MIME, just use the.brson,.7zbson, or.lz4bsonfile extension here. (Matching the filename extension)
- For the
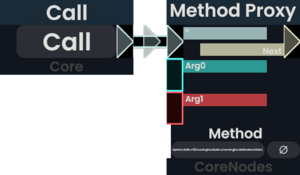
- Open the FileMetadata Sync Methods using the Show Delegates mod, and with the ProtoFlux Tool, grab and hold the
OnImportFilemethod. Then open the context menu while still holding it, selectProxy.
ProtoFlux Setup

- With the method proxy, connect it to anything that can send a pulse to it (the example shows a Call node doing this).