Updating to match new version of source page |
Created page with "Utiliser un serveur local - utilisé pour déboguer" |
||
| Line 31: | Line 31: | ||
* '''-Bootstrap ''Insérer_classe_de_démarrage_ici''''' - Lance une [[Bootstrapping|fonction de démarrage]] customisée. | * '''-Bootstrap ''Insérer_classe_de_démarrage_ici''''' - Lance une [[Bootstrapping|fonction de démarrage]] customisée. | ||
== Réseau == | |||
<!--T:35--> | <!--T:35--> | ||
* '''-ForceLANOnly''' - | * '''-ForceLANOnly''' - Tous les mondes seront forcés en réseau local seulement et ne seront pas accessible depuis internet. | ||
* '''-ForceRelay''' - | * '''-ForceRelay''' - Passe l'utilisation du [[Networking_Information#LNL|NAT Punchthrough]] a la connection vers une session et force l'utilisation d'un relais. | ||
* '''-UseLocalCloud''' - | * '''-UseLocalCloud''' - Utiliser un serveur local - utilisé pour déboguer | ||
* '''-UseStagingCloud''' - | * '''-UseStagingCloud''' - Utilise les serveurs Staging - utilisé pour déboguer | ||
== Préréglages de caméra drone == | |||
Ces options initialisent une caméra statique avec un script de drone utilisant un préréglage de mouvements. | |||
<!--T:8--> | <!--T:8--> | ||
| Line 52: | Line 50: | ||
<!--T:39--> | <!--T:39--> | ||
Ces arguments sont utilisables pour la caméra drone. | |||
* '''-UseResoniteCamera''' - | * '''-UseResoniteCamera''' - Va matérialiser une caméra statique comme caméra Resonite avec le contrôle du zoom, un retour et autres fonctions | ||
== Common Avatar Builder == | |||
* '''-ForceNoVoice''' - | * '''-ForceNoVoice''' - CommonAvatarBuilder ne créé pas d'avatars pouvant parler (utile pour les présentations locales) | ||
== Dossiers de données == | |||
Resonite a plusieurs [[Resonite Data Folders|dossier de données]], plusieurs arguments de lancement sont disponibles pour les controller: | |||
<!--T:43--> | <!--T:43--> | ||
* | * Vous pouvez [[Relocate Resonite Folders | bouger ou sont ces dossiers]] vers un autre disque. | ||
== Fichiers logs == | |||
* '''-LogsPath''' ''<span lang="en" dir="ltr" class="mw-content-ltr">C:\specified\directory</span>'' - <span lang="en" dir="ltr" class="mw-content-ltr">Redirect log files to be saved in a custom specified directory.</span> | * '''-LogsPath''' ''<span lang="en" dir="ltr" class="mw-content-ltr">C:\specified\directory</span>'' - <span lang="en" dir="ltr" class="mw-content-ltr">Redirect log files to be saved in a custom specified directory.</span> | ||
Revision as of 07:20, 6 February 2024
La version bureau de Resonite supporte des options de lancement. La pour la plupart de ces options, vous pouvez utiliser le lanceur de Resonite (pas encore publié) pour les configurer dans une version plus visuelle et les sauvegarder entre les lancements.
Ces options de lancement peuvent être utiles pour créer des expériences autonomes.
Forcer du matériel spécifique
- rien - auto détection
- -SteamVR - SteamVR
- -RiftTouch - Oculus Rift + manettes Touch
- -Screen - Mode écran (aussi appelé Desktop Mode)
- -Screen360 - Mode écran (avec projection 360)
- -StaticCamera - Mode caméra non-interactif
- -StaticCamera360 - Mode caméra non-interactif utilisant le rendu 360 equirectangle
- -MixedRealityCamera - Mode caméra non-interactif utilisant le rendu réalité mixte
- -LegacySteamVRInput - Forcer l'utilisation de l'ancienne manière d'entrée de SteamVR. Est utilisé comme correctif pour le matériel SteamVR qui manquent ou ont un mauvais squelette comme Virtual Desktop, utilisé par Oculus Quest.
- -ForceSRAnipal - Force le SDK SRAnipal a s'initialiser pour le traqueur HTC pour les yeux et le visage, même si le Vive Pro Eye n'est pas présent.
- -LegacyScreen - Forcer Resonite a lancer l'ancien mode écran en mode debug.
- -EnableOWO Insert_ip_address_here - Active la vest haptique OWO, demande l'adresse IP de votre veste. Ne fonctionne pas pour le moment, voir 186.
Rejoindre des sessions / Ouvrir des mondes
- -Join Auto - Automatiquement rejoint et suit les sessions active sur le réseau local (va dans le monde ayant le plus d'utilisateurs)
- -Join Insérer_URL_ou_IP:Port_Ici - Rejoint une session avec une URI donnée (Resonite-session | lnl)
- -Open Insérer_URL_ici - Ouvre un monde depuis une URL au lancement (resrec)
- -Scratchspace Insérer_port_ici - Démarre un scratchspace sur un port donné (vieux, va probablement être retiré)
- -AnnounceHomeOnLAN - Maison et Userspace seront disponible sur le réseau local par défaut
- -Bootstrap Insérer_classe_de_démarrage_ici - Lance une fonction de démarrage customisée.
Réseau
- -ForceLANOnly - Tous les mondes seront forcés en réseau local seulement et ne seront pas accessible depuis internet.
- -ForceRelay - Passe l'utilisation du NAT Punchthrough a la connection vers une session et force l'utilisation d'un relais.
- -UseLocalCloud - Utiliser un serveur local - utilisé pour déboguer
- -UseStagingCloud - Utilise les serveurs Staging - utilisé pour déboguer
Préréglages de caméra drone
Ces options initialisent une caméra statique avec un script de drone utilisant un préréglage de mouvements.
- -CameraBiggestGroup
- -CameraTimelapse
- -CameraStayBehind
- -CameraStayInFront
Ces arguments sont utilisables pour la caméra drone.
- -UseResoniteCamera - Va matérialiser une caméra statique comme caméra Resonite avec le contrôle du zoom, un retour et autres fonctions
Common Avatar Builder
- -ForceNoVoice - CommonAvatarBuilder ne créé pas d'avatars pouvant parler (utile pour les présentations locales)
Dossiers de données
Resonite a plusieurs dossier de données, plusieurs arguments de lancement sont disponibles pour les controller:
- Vous pouvez bouger ou sont ces dossiers vers un autre disque.
Fichiers logs
- -LogsPath C:\specified\directory - Redirect log files to be saved in a custom specified directory.
== Synchronization Issues ==
- If you're having synchronization issues then see Sync Errors which has various guides on how to use command line arguments to resolve sync issues.
== Database Repair ==
- If you're having database issues then Database repair is a guide on how to use a Command Line Argument to resolve the issue.
== Post Processing ==
- -ctaa - Enables ctaa (Cinematic Temporal Anti-Aliasing)
- -ctaaTemporalEdgePower Insert_Number_here - Sets ctaa's TemporalEdgePower
- -ctaaSharpnessEnabled Insert_True_or_False_here - Sets whether ctaa's Sharpness is Enabled
- -ctaaAptiveSharpness Insert_Number_here - Sets ctaa's ctaaAptiveSharpness amount
== Misc ==
- -Watchdog Insert_filepath_here - Resonite will periodically write current time into given file. This can be used to restart the process when it freezes
- -LoadAssembly Insert_path_here - Loads extra CLR assembly into the Resonite process
- -Kiosk - Will run Resonite in Kiosk mode (hides the Userspace items such as logo and world switcher and disables teleporting for guests by default)
- -NoUI - Hides the Userspace UI
- -CubemapResolution Insert_resolution_here - Force the 360 equirectangular rendering to use this resolution for the cubemap
- -DoNotAutoLoadHome - Wont' automatically load your cloud home on start (can still load manually)
- -ResetDash - Resets the layout of the dash to the default configuration.
- -SkipIntroTutorial - Prevents the intro tutorial from starting
- -Forceintrotutorial - Forces the intro tutorial to run
- -Invisible - Force your online status to be invisible on login.
- -EngineConfig Insert_filepath_here - Specifies a custom config file.
- -BackgroundWorkers Insert_number_here - overrides the number of background worker processes. WARNING: Don't use this unless you really need to, things could break!
- -PriorityWorkers Insert_number_here - overrides the number of priority worker processes. WARNING: Don't use this unless you really need to, things could break!
- -ForceReticleAboveHorizon - Disallows looking below the Horizon for desktop when in first person by default.
== Resonite Custom Protocol Handler (Steam only) ==
Resonite registers a custom protocol handler with your computer on installation. You can use this to create links which will open Resonite to a set location or world when they are clicked. These arguments are given to the Resonite launcher, which will make sure Resonite is launched and running and forward them to the running instance.
- Resonite:?world=Insert_URL_here - Open a world or session at given URL
- For example Resonite:?world=resrec:///U-ProbablePrime/R-9ce872e1-ffb8-4194-bb91-3d3ab5f157a1 - Will Open "The Directory" by ProbablePrime
- And for Sessions Resonite:?world=Resonite-session://eea1442e-0ff2-4d6a-ad16-2dac9ea786fc will join session eea1442e-0ff2-4d6a-ad16-2dac9ea786fc
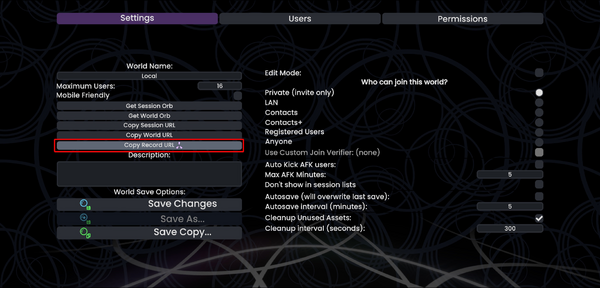
The URL of a world can be accessed by opening the inspector for a world orb and navigating to the WorldOrb component or by using the Session menu's "Copy Record URL" button:
The URL field can be selected by double clicking into the field. The URL text can be copied to the Windows clipboard via Ctrl+C.
When linking to a world on a platform that restricts the clickability protocol handlers, you can use the redirect junction located at https://api.resonite.com/open/ instead. They will redirect to use the above Resonite: protocol handler.
- https://api.resonite.com/open/world/Insert_ID_here - Open a world at given URL
- For example https://api.resonite.com/open/world/U-ProbablePrime/R-9ce872e1-ffb8-4194-bb91-3d3ab5f157a1 - Will Open "The Directory" by ProbablePrime
- https://api.resonite.com/open/session/Insert_ID_here - Open a session at given URL
- For example https://api.resonite.com/open/session/S-eea1442e-0ff2-4d6a-ad16-2dac9ea786fc will join session S-eea1442e-0ff2-4d6a-ad16-2dac9ea786fc
== Unity Standalone Player command line arguments ==
The Unity Standalone Player command line arguments can be useful for setting a specific resolution, or the windowed mode.
- -screen-fullscreen 0 - Launch Resonite in a window.
- -screen-fullscreen 1 - Launch Resonite in full-screen.
- -screen-width - Sets the horizontal resolution.
- -screen-height - Sets the vertical resolution.
Example: If you use -screen-fullscreen 0 -screen-width 1280 -screen-height 720 Resonite will launch in a 1280x720 window.
== How to use command line arguments ==
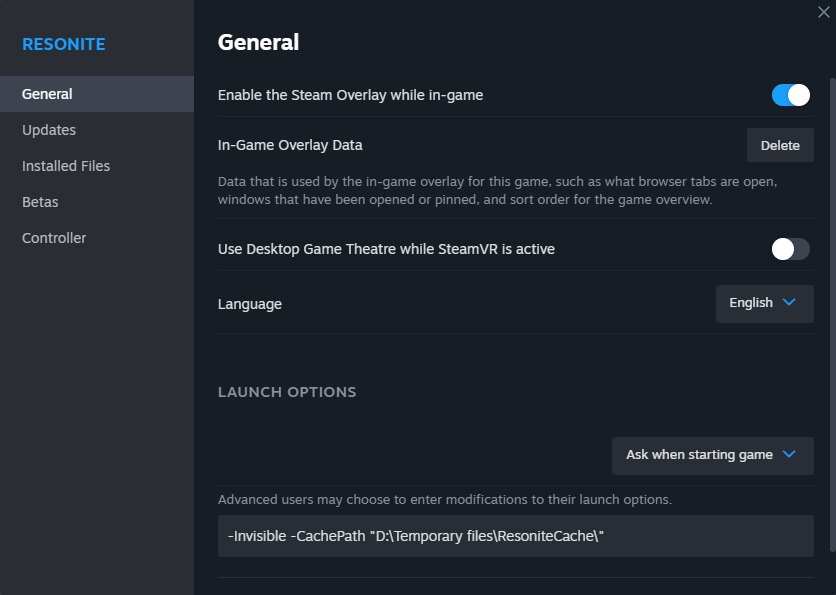
Below are three methods for launching Resonite using non-default command line arguments. Each example explains how to combine the -Invisible and -CachePath Insert_path_here commands. Here the examples show how to specify a non-default cache location at D:\Temporary files\ResoniteCache\. DO NOT COPY THIS EXAMPLE IF YOU DO NOT NEED TO DO THIS! Choosing the best method to use depends on how you normally launch Resonite. For most users, the setup described in #Launching from Steam is likely the best choice.
=== Launching from Steam ===
- Open Steam
- Right click on Resonite in your library
- Select "Properties" and then "Set Launch Options".
- Enter the command you need to use, exactly as it appears above and Run Resonite.
Now, if Resonite is launched via Steam, the custom command line arguments will take effect.
Commands entered via this method will not take effect if Resonite is launched any other way, such as directly launching the Resonite.exe.
=== For the Standalone build ===
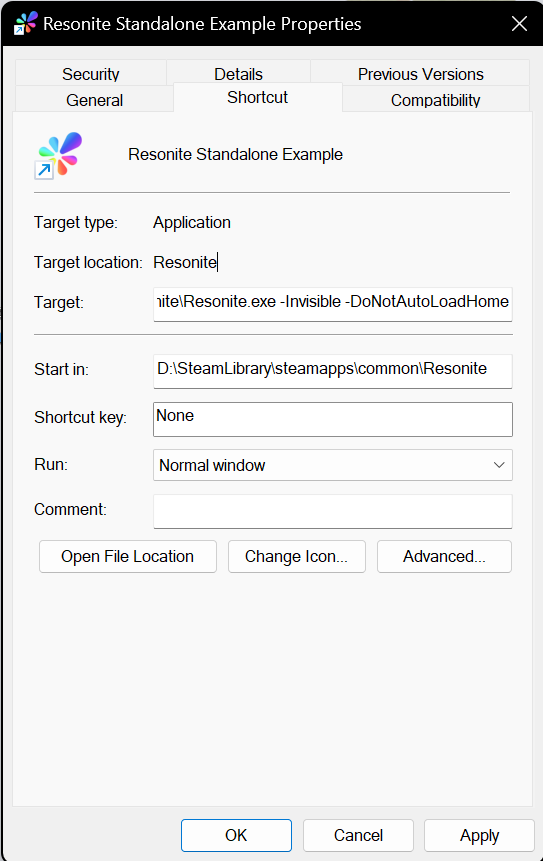
Use a shortcut
It is possible to use launch commands via a custom shortcut targeting the Resonite.exe file.
To create a shortcut:
- Find the Resonite install folder and right-click on the Resonite.exe.
- In the context menu click 'Create Shortcut'
- Move the 'Resonite.exe - Shortcut' file to somewhere more convenient (such as the Desktop).
- Right-click on the shortcut file and click 'Properties' in the context menu.
- This opens a dialog window. Select the 'Shortcut' tab.
- In the 'Target' text box add a space after the Resonite.exe filepath and then add your command line arguments.
- Click 'Apply' and 'OK'.
Now, if Resonite is launched by double clicking on the shortcut it will launch using the custom options. These will not be applied if a different method is used to start Resonite.


