Created page with "ログファイルを指定されたカスタムディレクトリに保存するようにリダイレクトします。" |
Created page with "=== Launching from Steam ===" |
||
| (3 intermediate revisions by the same user not shown) | |||
| Line 71: | Line 71: | ||
* 同期の問題が発生している場合は、[[Sync Errors|同期エラー]]を参照してください。そこには、起動引数を使用して同期の問題を解決するためのさまざまなガイドがあります。 | * 同期の問題が発生している場合は、[[Sync Errors|同期エラー]]を参照してください。そこには、起動引数を使用して同期の問題を解決するためのさまざまなガイドがあります。 | ||
== データベース修復 == | |||
* | * データベースの問題が発生している場合は、[[Database repair|データベース修復]]を参照してください。そこには、起動引数を使用して問題を解決するためのガイドがあります。 | ||
== ポストプロセシング == | |||
* '''-ctaa''' - <span lang="en" dir="ltr" class="mw-content-ltr">Enables ctaa (Cinematic Temporal Anti-Aliasing)</span> | * '''-ctaa''' - <span lang="en" dir="ltr" class="mw-content-ltr">Enables ctaa (Cinematic Temporal Anti-Aliasing)</span> | ||
* '''-ctaaTemporalEdgePower ''<span lang="en" dir="ltr" class="mw-content-ltr">Insert_Number_here</span>''''' - <span lang="en" dir="ltr" class="mw-content-ltr">Sets ctaa's TemporalEdgePower</span> | * '''-ctaaTemporalEdgePower ''<span lang="en" dir="ltr" class="mw-content-ltr">Insert_Number_here</span>''''' - <span lang="en" dir="ltr" class="mw-content-ltr">Sets ctaa's TemporalEdgePower</span> | ||
| Line 80: | Line 80: | ||
* '''-ctaaAptiveSharpness ''<span lang="en" dir="ltr" class="mw-content-ltr">Insert_Number_here</span>''''' - <span lang="en" dir="ltr" class="mw-content-ltr">Sets ctaa's ctaaAptiveSharpness amount</span> | * '''-ctaaAptiveSharpness ''<span lang="en" dir="ltr" class="mw-content-ltr">Insert_Number_here</span>''''' - <span lang="en" dir="ltr" class="mw-content-ltr">Sets ctaa's ctaaAptiveSharpness amount</span> | ||
== その他 == | |||
* '''-Watchdog ''<span lang="en" dir="ltr" class="mw-content-ltr">Insert_filepath_here</span>''''' - <span lang="en" dir="ltr" class="mw-content-ltr">Resonite will periodically write current time into given file. This can be used to restart the process when it freezes</span> | * '''-Watchdog ''<span lang="en" dir="ltr" class="mw-content-ltr">Insert_filepath_here</span>''''' - <span lang="en" dir="ltr" class="mw-content-ltr">Resonite will periodically write current time into given file. This can be used to restart the process when it freezes</span> | ||
* '''-LoadAssembly ''<span lang="en" dir="ltr" class="mw-content-ltr">Insert_path_here</span>''''' - <span lang="en" dir="ltr" class="mw-content-ltr">Loads extra CLR assembly into the Resonite process</span> | * '''-LoadAssembly ''<span lang="en" dir="ltr" class="mw-content-ltr">Insert_path_here</span>''''' - <span lang="en" dir="ltr" class="mw-content-ltr">Loads extra CLR assembly into the Resonite process</span> | ||
* '''-Kiosk''' - | * '''-Kiosk''' - Resoniteを[[Kiosk Mode|キオスクモード]]で実行します([[Userspace|ユーザースペース]]のアイテム(ロゴやワールドスイッチャーなど)を非表示にし、ゲストのテレポートをデフォルトで無効にします)。 | ||
* '''-NoUI''' - | * '''-NoUI''' - [[Userspace|ユーザースペース]]のUIを非表示にします。 | ||
* '''-CubemapResolution ''<span lang="en" dir="ltr" class="mw-content-ltr">Insert_resolution_here</span>''''' - <span lang="en" dir="ltr" class="mw-content-ltr">Force the 360 equirectangular rendering to use this resolution for the cubemap</span> | * '''-CubemapResolution ''<span lang="en" dir="ltr" class="mw-content-ltr">Insert_resolution_here</span>''''' - <span lang="en" dir="ltr" class="mw-content-ltr">Force the 360 equirectangular rendering to use this resolution for the cubemap</span> | ||
* '''-DoNotAutoLoadHome''' - | * '''-DoNotAutoLoadHome''' - 起動時にクラウドホームを自動的にロードしません(手動でロードすることは可能です)。 | ||
* '''-ResetDash''' - ダッシュメニューのレイアウトをデフォルトの設定にリセットします。 | * '''-ResetDash''' - ダッシュメニューのレイアウトをデフォルトの設定にリセットします。 | ||
* '''-SkipIntroTutorial''' - | * '''-SkipIntroTutorial''' - 起動時にゲームのチュートリアルを始めないようにします。 | ||
* '''-Forceintrotutorial''' - | * '''-Forceintrotutorial''' - 起動時にゲームのチュートリアルを強制的に開始します。 | ||
* '''-Invisible''' - | * '''-Invisible''' - ログイン時にオンラインステータスを非表示にします。 | ||
* '''-EngineConfig ''<span lang="en" dir="ltr" class="mw-content-ltr">Insert_filepath_here</span>''''' - | * '''-EngineConfig ''<span lang="en" dir="ltr" class="mw-content-ltr">Insert_filepath_here</span>''''' - カスタムの[[Startup Config File|起動設定ファイル]]を指定します。 | ||
* '''-BackgroundWorkers ''<span lang="en" dir="ltr" class="mw-content-ltr">Insert_number_here</span>''''' - <span lang="en" dir="ltr" class="mw-content-ltr">overrides the number of background worker processes. '''WARNING:''' Don't use this unless you really need to, things could break!</span> | * '''-BackgroundWorkers ''<span lang="en" dir="ltr" class="mw-content-ltr">Insert_number_here</span>''''' - <span lang="en" dir="ltr" class="mw-content-ltr">overrides the number of background worker processes. '''WARNING:''' Don't use this unless you really need to, things could break!</span> | ||
* '''-PriorityWorkers ''<span lang="en" dir="ltr" class="mw-content-ltr">Insert_number_here</span>''''' - <span lang="en" dir="ltr" class="mw-content-ltr">overrides the number of priority worker processes. '''WARNING:''' Don't use this unless you really need to, things could break!</span> | * '''-PriorityWorkers ''<span lang="en" dir="ltr" class="mw-content-ltr">Insert_number_here</span>''''' - <span lang="en" dir="ltr" class="mw-content-ltr">overrides the number of priority worker processes. '''WARNING:''' Don't use this unless you really need to, things could break!</span> | ||
* '''-ForceReticleAboveHorizon''' - <span lang="en" dir="ltr" class="mw-content-ltr">Disallows looking below the Horizon for desktop when in first person by default.</span> | * '''-ForceReticleAboveHorizon''' - <span lang="en" dir="ltr" class="mw-content-ltr">Disallows looking below the Horizon for desktop when in first person by default.</span> | ||
== Resoniteカスタムプロトコルハンドラー(Steam専用) == | |||
<div lang="en" dir="ltr" class="mw-content-ltr"> | <div lang="en" dir="ltr" class="mw-content-ltr"> | ||
| Line 128: | Line 128: | ||
** <span lang="en" dir="ltr" class="mw-content-ltr">For example '''https://api.resonite.com/open/session/S-eea1442e-0ff2-4d6a-ad16-2dac9ea786fc''' will join session S-eea1442e-0ff2-4d6a-ad16-2dac9ea786fc</span> | ** <span lang="en" dir="ltr" class="mw-content-ltr">For example '''https://api.resonite.com/open/session/S-eea1442e-0ff2-4d6a-ad16-2dac9ea786fc''' will join session S-eea1442e-0ff2-4d6a-ad16-2dac9ea786fc</span> | ||
== Unityスタンドアロンプレイヤーの起動引数 == | |||
<!--T:15--> | <!--T:15--> | ||
| Line 138: | Line 138: | ||
<span lang="en" dir="ltr" class="mw-content-ltr">Example: If you use <code>-screen-fullscreen 0 -screen-width 1280 -screen-height 720</code> Resonite will launch in a 1280x720 window.</span> | <span lang="en" dir="ltr" class="mw-content-ltr">Example: If you use <code>-screen-fullscreen 0 -screen-width 1280 -screen-height 720</code> Resonite will launch in a 1280x720 window.</span> | ||
== 起動引数の使用方法 == | |||
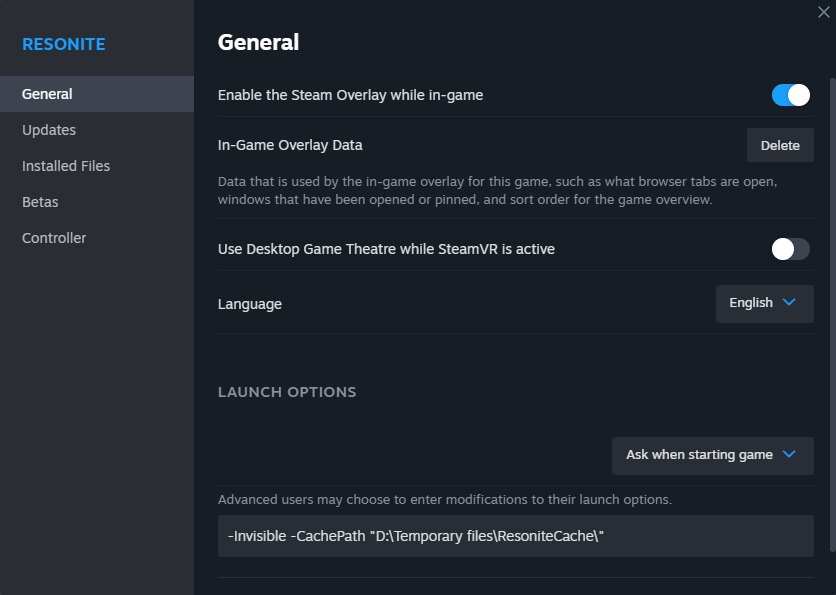
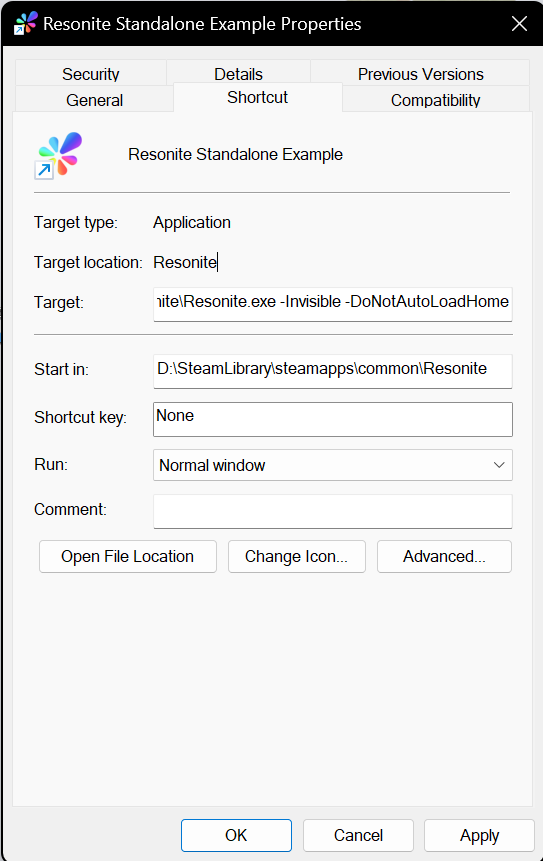
以下は、Resoniteをデフォルト以外の起動引数を使用して起動するための3つの方法です。それぞれの例では、'''-Invisible''' および '''-CachePath ''Insert_path_here''''' コマンドを組み合わせる方法を説明しています。ここでの例では、<code>D:\Temporary files\ResoniteCache\</code> にデフォルト以外のキャッシュ場所を指定する方法を示しています。必要がない場合はこの例を'''コピーしないでください!''' どの方法を選択するかは、通常Resoniteをどのように起動するかに依存します。ほとんどのユーザーにとっては、「[[#Launching from Steam|Steamからの起動]]」で説明されている設定が最適な選択肢である可能性があります。 | |||
=== Launching from Steam === | |||
<span lang="en" dir="ltr" class="mw-content-ltr">{{SteamCommandLineArguments}}</span> | <span lang="en" dir="ltr" class="mw-content-ltr">{{SteamCommandLineArguments}}</span> | ||
=== スタンドアロンビルドの場合 === | |||
<span lang="en" dir="ltr" class="mw-content-ltr">{{StandaloneCommandLineArguments}}</span> | <span lang="en" dir="ltr" class="mw-content-ltr">{{StandaloneCommandLineArguments}}</span> | ||
Latest revision as of 08:30, 13 July 2024
Resoniteのデスクトップ版ビルドでは、いくつかのコマンドライン引数がサポートされています。これらの引数のほとんどは、Resonite Launcherを使用して、より視覚的な方法で設定し、起動ごとに保存することができます。
These command line arguments, can be useful in setting up Standalone Experiences. これらのコマンドライン引数は、Standalone Experiencesの設定に役立ちます。
特定のハードウェアを強制使用する
- 指定なし - 自動検出
- -SteamVR - SteamVR
- -RiftTouch - Oculus Rift + Touch controllers
- -Screen - スクリーンモード(デスクトップモードとも呼ばれます)
- -Screen360 - スクリーンモード(360度投影付き)
- -StaticCamera - non-interactive Camera Mode
- -StaticCamera360 - non-interactive Camera Mode using 360 equirectangular rendering
- -MixedRealityCamera - non-interactive Camera Mode using Mixed Reality rendering
- -LegacySteamVRInput - Force Legacy Steam VR Input Handling. Used as a work-around for some Steam VR devices that have a missing or bad hand skeletal model, such as Virtual Desktop used with the Oculus Quest.
- -ForceSRAnipal - Force the SR Anipal SDK to initialize for HTC eye and lip tracking, even if Vive Pro Eye is not present.
- -LegacyScreen - Force Resonite to run in the old Desktop "debugging" mode.
- -EnableOWO Insert_ip_address_here - Enables the OWO Game haptic vest integration, requires you pass in the vest's ip address. Currently not functional, see related Github issue.
セッションへ参加 / ワールドを開く
- -Join Auto - LAN上のアクティブセッションに自動的に参加してフォーカスします(最も多くのユーザーがいるワールドに切り替わります)
- -Join Insert_URL_or_IP:Port_here - 指定されたURI(Resonite-session | lnl)でセッションに参加します
- -Open Insert_URL_here - 起動時に指定されたURLのワールドを開きます(resrec)
- -Scratchspace Insert_port_here - Starts a new scratchspace world on a given port (legacy, will be likely removed)
- -AnnounceHomeOnLAN - ホームワールドと ユーザースペースがデフォルトでLANからアクセス可能になります
- -Bootstrap Insert_bootstrap_class_here - Run a custom bootstrap function in a class of given name
ネットワーク
- -ForceLANOnly - すべてのワールドはデフォルトでLANネットワーク上のみに公開され、インターネットからはアクセスできません
- -UseLocalCloud - Uses local cloud API servers - used mostly for debugging
- -UseStagingCloud - Uses Staging API servers - used mostly for debugging
ドローンカメラのプリセット
These initialize the static camera with a drone script, using a specific movement preset.
- -CameraBiggestGroup
- -CameraTimelapse
- -CameraStayBehind
- -CameraStayInFront
And also these args usable for Drone Camera.
- -UseResoniteCamera - Will spawn Static Camera as the Resonite Camera with zoom controls, preview and other functions
共通アバタービルダー
- -ForceNoVoice - CommonAvatarBuilder won't setup any avatars with voice (useful for local presentations)
データフォルダー
Resoniteには複数のデータフォルダーがあり、これらを制御するためのさまざまなコマンドライン引数があります。
- 起動引数を使用して、データフォルダーを他の場所に移動することができます。
ログフォルダー
- -LogsPath C:\specified\directory - ログファイルを指定されたカスタムディレクトリに保存するようにリダイレクトします。
同期の問題
- 同期の問題が発生している場合は、同期エラーを参照してください。そこには、起動引数を使用して同期の問題を解決するためのさまざまなガイドがあります。
データベース修復
- データベースの問題が発生している場合は、データベース修復を参照してください。そこには、起動引数を使用して問題を解決するためのガイドがあります。
ポストプロセシング
- -ctaa - Enables ctaa (Cinematic Temporal Anti-Aliasing)
- -ctaaTemporalEdgePower Insert_Number_here - Sets ctaa's TemporalEdgePower
- -ctaaSharpnessEnabled Insert_True_or_False_here - Sets whether ctaa's Sharpness is Enabled
- -ctaaAptiveSharpness Insert_Number_here - Sets ctaa's ctaaAptiveSharpness amount
その他
- -Watchdog Insert_filepath_here - Resonite will periodically write current time into given file. This can be used to restart the process when it freezes
- -LoadAssembly Insert_path_here - Loads extra CLR assembly into the Resonite process
- -Kiosk - Resoniteをキオスクモードで実行します(ユーザースペースのアイテム(ロゴやワールドスイッチャーなど)を非表示にし、ゲストのテレポートをデフォルトで無効にします)。
- -NoUI - ユーザースペースのUIを非表示にします。
- -CubemapResolution Insert_resolution_here - Force the 360 equirectangular rendering to use this resolution for the cubemap
- -DoNotAutoLoadHome - 起動時にクラウドホームを自動的にロードしません(手動でロードすることは可能です)。
- -ResetDash - ダッシュメニューのレイアウトをデフォルトの設定にリセットします。
- -SkipIntroTutorial - 起動時にゲームのチュートリアルを始めないようにします。
- -Forceintrotutorial - 起動時にゲームのチュートリアルを強制的に開始します。
- -Invisible - ログイン時にオンラインステータスを非表示にします。
- -EngineConfig Insert_filepath_here - カスタムの起動設定ファイルを指定します。
- -BackgroundWorkers Insert_number_here - overrides the number of background worker processes. WARNING: Don't use this unless you really need to, things could break!
- -PriorityWorkers Insert_number_here - overrides the number of priority worker processes. WARNING: Don't use this unless you really need to, things could break!
- -ForceReticleAboveHorizon - Disallows looking below the Horizon for desktop when in first person by default.
Resoniteカスタムプロトコルハンドラー(Steam専用)
Resonite registers a custom protocol handler with your computer on installation. You can use this to create links which will open Resonite to a set location or world when they are clicked. These arguments are given to the Resonite launcher, which will make sure Resonite is launched and running and forward them to the running instance.
- Resonite:?world=Insert_URL_here - Open a world or session at given URL
- For example Resonite:?world=resrec:///U-ProbablePrime/R-9ce872e1-ffb8-4194-bb91-3d3ab5f157a1 - Will Open "The Directory" by ProbablePrime
- And for Sessions Resonite:?world=Resonite-session://eea1442e-0ff2-4d6a-ad16-2dac9ea786fc will join session eea1442e-0ff2-4d6a-ad16-2dac9ea786fc
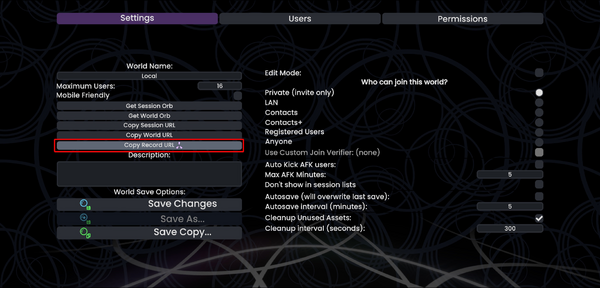
The URL of a world can be accessed by opening the inspector for a world orb and navigating to the WorldOrb component or by using the Session menu's "Copy Record URL" button:
The URL field can be selected by double clicking into the field. The URL text can be copied to the Windows clipboard via Ctrl+C.
When linking to a world on a platform that restricts the clickability protocol handlers, you can use the redirect junction located at https://api.resonite.com/open/ instead. They will redirect to use the above Resonite: protocol handler.
- https://api.resonite.com/open/world/Insert_ID_here - Open a world at given URL
- For example https://api.resonite.com/open/world/U-ProbablePrime/R-9ce872e1-ffb8-4194-bb91-3d3ab5f157a1 - Will Open "The Directory" by ProbablePrime
- https://api.resonite.com/open/session/Insert_ID_here - Open a session at given URL
- For example https://api.resonite.com/open/session/S-eea1442e-0ff2-4d6a-ad16-2dac9ea786fc will join session S-eea1442e-0ff2-4d6a-ad16-2dac9ea786fc
Unityスタンドアロンプレイヤーの起動引数
The Unity Standalone Player command line arguments can be useful for setting a specific resolution, or the windowed mode.
- -screen-fullscreen 0 - Launch Resonite in a window.
- -screen-fullscreen 1 - Launch Resonite in full-screen.
- -screen-width - Sets the horizontal resolution.
- -screen-height - Sets the vertical resolution.
Example: If you use -screen-fullscreen 0 -screen-width 1280 -screen-height 720 Resonite will launch in a 1280x720 window.
起動引数の使用方法
以下は、Resoniteをデフォルト以外の起動引数を使用して起動するための3つの方法です。それぞれの例では、-Invisible および -CachePath Insert_path_here コマンドを組み合わせる方法を説明しています。ここでの例では、D:\Temporary files\ResoniteCache\ にデフォルト以外のキャッシュ場所を指定する方法を示しています。必要がない場合はこの例をコピーしないでください! どの方法を選択するかは、通常Resoniteをどのように起動するかに依存します。ほとんどのユーザーにとっては、「Steamからの起動」で説明されている設定が最適な選択肢である可能性があります。
Launching from Steam
- Open Steam
- Right click on Resonite in your library
- Select "Properties" and then "Set Launch Options".
- Enter the command you need to use, exactly as it appears above and Run Resonite.
Now, if Resonite is launched via Steam, the custom command line arguments will take effect.
Commands entered via this method will not take effect if Resonite is launched any other way, such as directly launching the Resonite.exe.
スタンドアロンビルドの場合
Use a shortcut
It is possible to use launch commands via a custom shortcut targeting the Resonite.exe file.
To create a shortcut:
- Find the Resonite install folder and right-click on the Resonite.exe.
- In the context menu click 'Create Shortcut'
- Move the 'Resonite.exe - Shortcut' file to somewhere more convenient (such as the Desktop).
- Right-click on the shortcut file and click 'Properties' in the context menu.
- This opens a dialog window. Select the 'Shortcut' tab.
- In the 'Target' text box add a space after the Resonite.exe filepath and then add your command line arguments.
- Click 'Apply' and 'OK'.
Now, if Resonite is launched by double clicking on the shortcut it will launch using the custom options. These will not be applied if a different method is used to start Resonite.


