
Tutorial:Clothing
More actions

Resonite provides as with many things, more than one way to do something and adding pre-made clothing to your avatar is no exception. With the exception of simple items such as hats, bracelets or similar accessories most clothing needs has rigging just like like avatars and also could have a number of blendshapes that interact with the model.
This tutorial assumes the user knows how to use the Dev Tool, has already imported and set up their avatar and knows how to use basic Resonate systems such as the Scene Inspector as well as what a slot is, how to drag and move things around in the Avatar's Hierarchy and dragging references into fields. Everything in this tutorial is also done only using components and avoids ProtoFlux to avoid the use of other tools.
There are two main ways to attach more complicated items to your avatar:
- Static:
- Easy and quick, (nearly)always works, less go wrong.
- Simple context menu toggles to enable/disable clothing items.
- Everything always remains part of your avatar.
- Dynamic:
- More fun and flexible but more complicated.
- Allows clothing to be physically removed or even swapped between compatible avatars.
- Leave your clothing spread around the room!
- Also handy for rigged assets you don't want to save with your avatar.
Importing
Mostly: Avatar Importing Guide#Clothing And running: Component:SkinnedMeshRenderer#Optimization over it to strip out blendshapes and bones that are not needed to make things more clear.
Clothing has to match your model's rigging/weight painting and be made to fit if you want it to 'just work'. This requires the clothing to have been made for your avatar's model. While it's sometimes possible to change things in game to make some items that were never intended for your model to work, this is not a subject for this tutorial.
It's sometimes possible to separate some clothing/items out of an existing avatar if it has a separate material using Component:SkinnedMeshRenderer#Blendshape removal for use by the 'Dynamic' method. Otherwise this step needs to be done in an external program such as Blender and is well beyond the scope of this tutorial.
Static method
The videos at the end of this page show this method. As it's well documented there, this part of the tutorial will be fairly basic.
Attaching
Moving model's assets to the model's hierarchy:
This involves reparenting(dragging a slot into another) the slot containing the mesh into the avatar's hierarchy.
Placing it under CenteredRoot is suggested. ie. Where the 'Body' mesh is. It's good practice to reset the transforms(Position/Rotation/scale) of the assets.
Make sure the materials are also moved over as well though they should be included with the meshes.
Rig
Dragging bones over from avatar's main hierarchy Component:Rig to replace the bones in the clothing's Rig component.
(Is there a tool?)
Blendshapes
Many avatars and clothing have blendshapes that need to be manipulated to make everything work correctly. There are typically two sets of them.
The first are ones to match the body shape, for example making the chest of the clothing grow with the avatar's, these are typically on the clothing and can be linked by creating a Linkage#Drives between the blendshapes.
The second are ones on the avatar that shrink or hide the body mesh to allow it to fit under clothing, these can either be set manually or controlled through the context menu when you enable the clothing item.
Context Menu
For a more detailed Tutorial: Tutorial:Context Menu
- BooleanValueDriver<float>: Connecting ButtonToggle to this component's State field allow driving of BlendShapes directly. See component for examples.
- ValueMultiDriver: Used if you need to drive a number of fields(For example several clothing items), not just a single one.
- Component:MultiBoolConditionDriver: Lets you control what gets turned on and off depending on states.
Fixing problems
Sometimes body meshes might clip through clothing, you can try try overdriving(Setting a value larger than 0-1) the blendshape that for example narrows the arms to fit in sleves.
Dynamic method
Assets need to be attachable and controllable from the avatar and disconnect able when removed. DynVars are the magic that makes this work.
As above this is all done with components. There are other ways that involve ProtoFlux, slot searching and the VirtualParent component, however while more flexible in many ways, this is also a more complicated for newer users and much harder to document well.
Snappers
- Moving the model to the avatar and making a named snapper: Component:Snapper
- Suggested to add clothing snapper to somewhere that matches the item. Chest for a hoodie, hips for pants, for example.
- Use:
Create Pivot At Center(?) (Move in place and just parent from slot?) from the Scene Inspector then create a snapper from that?
- Final slots should be: <Avatar Armature> -> <SnapperTargetSlot> -> <SnapperSlot> -> Clothing assets.
- Make sure grabbable component is on the SnapperSlot along with the collider you plan to use. And that the assets are in another slot further up.
- Use
Keywordsto make it so only that item can snap there.
Dynvars
On avatar
To make things easier for future clothing/options, this tutorial recommends using the Avatar standard and running through the setup there. There are tools to help guide the setup.
- The parts used by this tutorial are the Avatar standard#Armature Variables, mostly "Bone.Name" ones and Avatar standard#Blendshapes
- If you want only the required ones: Inital Component:DynamicVariableSpace on avatar root and use Component:DynamicReference can be used to reference all the bones required.
On clothing (Rig)
Matching dynvars that are needed. Create a slot under the clothing item. Existing bone/rig can be left alone though as it's useful shortly.
- Component:DynamicReferenceVariableDriver to connect everything up and revert to original rig when not snapped.
- 'Bone.Name' for all of the required bones. For each use
TargetReferenceon the rig component andDefaultTargetto the original rig.
- 'Bone.Name' for all of the required bones. For each use
- When the bones dynamically changed the SkinnedMeshRenderer doesn't always recognize the new bones, likely because the component hasn't detected the field being cleared. You can force it to reset by making it think you have added a new bone.
- On the SkinnedMeshRendererunder the 'Bones' list, press 'Add'. This creates a bone connected to nothing.
- Set up the bone with a dynvar as with the others, give it a name such as "Fake Bone"
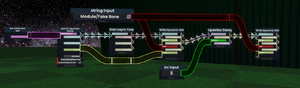
Flux to force a reset - Set up the flux as on the right with the dynvar chosen above in the 'String Input' field and drag a known bone from your avatar into the field on the DynamicVariableInputWithEvents node, the example used is the Hips Body Node.
- This will detect when the chosen avatar dynvar is connected to the clothing item and fire an impulse that will set the fake bone to this refrence, wait a few engine ticks then clear it. The SkinnedMeshRenderer will then detect this and refresh.

Blendshapes
Dynvars that also drive blendshapes that for example shrink limbs or hide body mesh parts to allow for clothing.
These are dynvars on the clothing that changes the avatar blendshapes.
Add: Component:DynamicValueVariable to the clothing to drive the blendshapes to the state you want.
For easier time, use DynamicReferenceVariableDriver to drive bools. Avatar standard has examples of how to drive these.
Materials
Make sure they are all copied to or duplicated on the removable item.
Context menu
- While toggles to hide clothing are less needed, other options might be useful:
- Menu options that 'lock' clothing if you don't want to only use grab permissions. Driving
Enabledon Component:Grabbable
- Menu options that 'lock' clothing if you don't want to only use grab permissions. Driving
- The context menu needs to be installed on the clothing snapper so it can be removed along with the rest of the assets.
- The easiest way is to create a new context menu compete with Component:RootContextMenuItem, however using DynVars to drive the Parent Slot of a simplified menu to place it under an existing avatar context menu also works.
Issue workaround
Permissions
Component:DestroyProxy and Component:DestroyOnUserLeave to clean up.
Make sure to add Component:SimpleAvatarProtection to items you don't want stolen/saved by other users.
Optional grab permissions so only you can take your stuff off. Adding yourself toOnlyUsers for example.
Advanced tricks
Clothing can be sometimes made to fit an avatar it was never intended to fit. These are a few notes in case you are feeling brave and wish to experiment.
The simplest method involves instead of changing the bones in the Rig component, reparenting each of the clothing's existing bones to the matching one on the avatar. After resetting the transforms, you can then scale or move each of the clothing's bone so the clothing fits the avatar as best as possible. It's also worth playing with the blendshapes to get as much close as possible too.
To make your avatar not clip through the clothing if it doesn't have appropriate blendshapes for the item you can try changing the scale of the bones on your avatar related to those area. However this is not recommended as it can break other things.
Videos
Static method:
Matching clothing toggles: