Tutorial:RGB Cube
More actions
This is meant as a quick jump into the Entity Component System (Slots/Components) and Protoflux. Over the course of this tutorial you will create a RGB cube from scratch and play around a bit with a few tools.
It is assumed that you already know how to navigate your Dash Menu or how to open a Context Menu.
Note: Clicking in this tutorial refers to hitting the primary action key. (i.e. left mouse button on desktop mode)
Basic Visuals
«In the beginning, there was nothing.
And Frooxius said, ‘Let there be light.’
And there was light.» [Citation needed]
But what help is light if there is nothing to see?

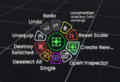
So, equip a Dev Tool, open the context menu, and select Create New..., then double-click Empty Object.
-
 Context Menu
 -
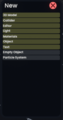 "Create New..." Window


You created an empty Slot - still a bit boring, right?
This is because Slots are just containers for Components and other Slots. They don't do anything on their own. (except having a name, being in a 3D hierarchy and a few other properties)
Click Attach Component and select the component Assets/Procedural Meshes/BoxMesh. (double clicks!)
You added a component to the slot. They are the actual things you see, hear, touch etc.
But why don't you see the box you just created?
The reason is that while some components do things, some other components just represent data - like a BoxMesh which is just 24 vertices, connected by 12 triangles. There is no instruction telling Resonite to render this mesh.
You can fix this by adding the component Rendering/MeshRenderer. And don't cheat by clicking Setup Renderer!
The MeshRenderer component will tell the engine to actually render a mesh.
Emphasis is on a mesh! You need to specify which one with the Mesh property.
To fill it, first grab the header of the BoxMesh component.
You are now holding a reference to the mesh which is visualized with a preview of the mesh data.
Then point at the Mesh property or the MeshRenderer and let go. (alternative: click while pointing at the property)
Success, there is something to look at!
But what is this checkerboard pattern?
The answer is simple: Resonite now knows the shape of the object but not what its surface is like. (Is it green like grass? Is it shiny? Does it glow in the dark?)
For a start just add the component Assets/Metarials/PBS_Metallic.
Similar to the mesh this component just represents some data.
To put it into the MeshRenderer, just click the Add button under Materials (list): and fill the new entry with a reference to the material. (grab&drop/click!)
This looks very close to the default cube. You could almost touch it - but you can't!
Basic Interaction
Your creation still lacks in the interactive part of the experience.
To be able to physically interact the Physics category of components is a must-have. In this case you must choose one of the Colliders, and which of them matches a box the most if not the BoxCollider?
Your laser now hits the box - that's it. Now that you could interact with it you need to specify how:
Attach the component Transform/Interaction/Grabbable. This tells Resonite that anyone can grab this object when their laser or grab sphere touch it and they use their grab action.
You want to change the size of your box while holding it? Enable the Scalable property of the Grabbable and pick it up with two hands! (Desktop: right mouse button to “grab” + Shift + move mouse wheel)
Editing
A box like this is not very useful. You can't even hit people with it.
You can blame the shape: It's just too fat!
Go to the BoxMesh component and edit the Size property to be [0.1; 0.1; 1].
Changing the size of a box by numbers is a bit lame. This is where you can use the power of Dev Tools:
Use secondary action while pointing at the box to select it, open the context menu and select Gizmo Options/MeshRenderer.
This is one example of the many types of Gizmos that can be interacted with via primary action.
Note that they usually have priority over other colliders, allowing you to interact with Gizmos behind your object!
Have you noticed that the selection visuals don't align with the dimensions of your box visuals?
Take a look at the BoxCollider!
It also has a Size. Visualize it by clicking the button Visualize Collider within the BoxCollider component!
Now copy the values from the MeshRenderer to the BoxCollider!
Ta-da! It matches the visuals again.
For the purpose of this tutorial let's assume you are not happy with the dimensions:
- Change them!
- And make sure that the collider matches the visuals!
- Change it again while matching the collider!
- Do it again!
- And again!
- Do it 100 times!
Okay... That probably is enough. Tedious, right?
So, here are a few tricks that you may have figured out on the way:
- You can copy and paste text via the clipboard of the operating system of your choice. In VR there are usually dedicated keys on your keyboard while on desktop you use the shortcuts
Ctrl+CandCtrl+V. - You can “Grab & Drop” texts from one text field to another.
- Grabbing the colored icon to the left of a property name and dropping it directly on a property name of a compatible type allows you to copy the full value at once. (a 3-dimensional vector here)
- Even with all those tricks it is tedious work to copy all those values manually. Mistakes are a guarantee!
Simple Data Binding
Introducing: Transform/Drivers/ValueCopy
Configure it like this:
Sourceshould be a reference to theSizeof the BoxMesh. Grab the property name and drop/click it here. (on the input which shows anullvalue by default!)Targetshould be a reference to theSizeof the BoxCollider.
Now it should do the work for you - all changes to the BoxMesh will be applied to the BoxCollider.
Take a look at the Size property of the BoxCollider:
Why is it pink?!
This color indicates that a property is driven.
If you are afraid of Wiki links, here is the short version:
- It is not an independent value anymore but instead computed from others. (
Sizeof BoxMesh in this case) - As a side-effect it disables the FrooxEngine magic that communicates values across the network. Everyone computes their own version. (Warning: Links contain quite technical Wiki pages!)
Try to edit the Size of the BoxCollider now!
It doesn't work, right? This makes sense if you consider that this value is not independent anymore. Even assuming that you were temporarily changing it - which you didn't - it would be overwritten by ValueCopy immediately. (Note: the inner workings are slightly different and also a bit more complex.)
This behaviour changes when you enable WriteBack.
Now you can change the Size of either BoxMesh or BoxCollider and the other will change accordingly.
This example shows that there may be many useful components you haven't heard of before and even simple properties may change their behaviour completely.
You may be overwhelmed by how many there are, so take it easy and learn it in your own pace!
At good starting point is the category Transform/Drivers which contains many useful components that are centered around driving values.
It doesn't matter if you just try stuff on your own or if you study the Wiki:
If you are stuck, ask the community! We are happy to share our experience with you.
In fact teaching others or being taught in Resonite is a nice, social experience on its own. More often than not, not only the “student” but also the “teacher” learns something new. (Bonus: There are no exams, you just learn for life!)
If you still have energy you may continue with the next chapter to be introduced to programming in Resonite.
Otherwise you can save your box when you grab it, open your Dash Menu, select one of your own directories inside the Inventory and click Save Item.
Don't forget to give your project a proper (Slot) name before saving! (Too late, isn't it? :-P)
Programming
Only grabbing and scaling becomes boring after a while. Wouldn't it be nicer if your project could actually do something a little more complex?
You could make it spin, snap to other objects or just look creepy.
There are many things Resonite has components for and a lot of things you can do with a combination of them and if you want to do even more you can create your own logic in ProtoFlux, the visual programming language of Resonite.
So equip your ProtoFlux Tool and start programming!
ProtoFlux Basics
Oh, you don't know programming? That's fine! This is a tutorial. (Even experienced developers should continue reading to familiarize with the syntax!)
So, for a start, find the AlbedoColor property of your PBS_Metallic. Then grab the property name with the equipped ProtoFlux Tool and select the context menu Source.
You have created a Source node which is one of the bridges that connect your code with the World around it.
It allows you to read the value of a property directly.
To demonstrate this, use and hold down primary action on the orange output that shows the tooltip *<colorX> on your ProtoFlux tool and tap secondary action.
You have now created a Value Display node which is displaying the value connected to its input directly. Their main use is to test your code since they are only visible when the code is visible. (Also very useful when exploring unknown nodes/code!)
Change the AlbedoColor with the inspector and observe that the Display node changes output! (Hint: You can click the colored rectangles next to the raw color value to open a color picker!)
The Source node also acts as a bridge in the other direction. To do this open the context menu of the ProtoFlux Tool and click Browse nodes.
You have opened the node browser which you navigate through via double-clicks of your primary action.
Go to the category Actions/Write
ObjectWrite? ValueWrite? <T> or <C,T>?
This is a bit confusing for the start but you will get there. For now:
- Grab the node browser and create a duplicate of it via the context menu! Put it to the side for later!
- Navigate to the subcategory
ValueWrite<T>, scroll down until you find the entryValueWrite<colorX>and double-click it with the ProtoFlux Tool!
You have selected the node type ValueWrite<colorX>.
Double-click primary with the ProtoFlux Tool while not pointing at things to create one!
On this Write node you can see multiple inputs (left) and outputs (right) as well as something that looks close to a property:
- A white triangle-shaped input which identifies as
*<ISyncOperation>when pointing at it - This will trigger the write node when an Impulse comes through.
- Use primary-drag + secondary-click to create a Call Input node that you can use to start execution of an impulse chain!
- An orange rectangular input which identifies as
Value<colorX> - This is the value that will be written into the variable targeted by the node.
- Create a Input node the same way you created the Call Input and change it to a proper color! (Default is transparent black: Set
Alphato 1.0 to remove transparency!) - Two triangle-shaped outputs identified as
OnWritten<Continuation>andOnFail<Continuation> - Once the Write node has done its thing, it chooses one of those outputs to continue with the next node. (usually OnWritten, unless something is wrong like “no variable to write to”)
- Use primary-drag + secondary-click again to create an Impulse Display node for each output!
- A “property” called
Variable - This is the variable this node will write to.
- Set this up by primary-dragging from the output of the Source node to the label or reference input below it! The reference input should now display
ValueSource`1instead ofnull.
If you followed all steps your code should now look like this:
Execute it by clicking the Call button on the Call Input node! The box should now have changed color.
If that didn't happen, check:
- Is the code connected like shown? Is there an arrow between the Source and the Write node when you hover over either?
- Look at the impulse outputs: If the impulse exited via
OnFailyour source may point to a material or Source node you have destroyed already. (e.g. if you had multiple cubes and deleted the wrong one) - Click the arrow button on the source field: If nothing happens it points to an already destroyed material. Otherwise, check if the material is actually used with the MeshRenderer!
- Did you try to change the color to the same color the cube had already? Please change the input to the write node to something where you actually notice the change!
PS: Those are good troubleshooting tips in general. Feel free to look at them even if everything worked on the first try!
Basic Automation and Packing
So, now you have a color-changing box. How can it be improved?
- You want to assign a random color?
-
- Create a Random Hue ColorX node from the category
Math/Random! - Connect it to the Write node's
Valueinput with primary-drag from its output to the input! (or the other way around!)
- Create a Random Hue ColorX node from the category
- You want to trigger a color change automatically, e.g. when you hit something with the box?
-
- Create the node On Contact Start from the category
Physics/Events! - Connect its
OnEventimpulse output with the*input of the Write node! (primary-drag again...) - Grab the BoxCollider component's title and let go of it while pointing at the
Colliderproperty of On Contact Start! - Change the BoxCollider's
TypetoActiveto make it actively detect collisions with other colliders!
- Create the node On Contact Start from the category
- You want to play a sound on each color change?
-
- Create the node Play One Shot from the category
Audio! - Create a connection from the Write node's
OnWrittenoutput to the*input of the Play One Shot! - Create an input node for the
Clipinput of the Play One Shot! (Remember: primary-drag + secondary!) - Get/import an audio clip and put it into the audio clip input. (e.g. primary-click with your laser while grabbing)
- If you don't have any at hand, use a Microphone to record a very short sound! (<1s, don't forget to reequip the ProtoFlux tool again!)
- Go to the inspector showing your Box! On the left side (a hierarchical view) grab the item representing your box, open your context menu and select
Reference! This spawns a Changeable Source node that outputs a reference to your box. - Connect the Changeable Source to the
Rootinput of the Play One Shot! This makes sure that the sound comes from the box and not from the code.
- Create the node Play One Shot from the category
If you tried to save your creation you would quickly notice that it would not be interactive - it was saved without code. It would also be nice if the code wasn't so visible. To fix that you need to put the code into it. This is called “packing”. It consists of two steps:
- With the ProtoFlux Tool equipped, hold secondary down while pointing at a node until the circle is filled, then let go!
- All connected nodes are now selected. This collection of connected nodes is called a ProtoFlux group.
- With the same tool, grab the slot of your project from the left half of a Scene Inspector Dialog and select the context menu item `Pack Into`!
- If you need to open a new inspector dialog, use a Dev Tool, select your object with secondary action and `Open Inspector` from the context menu!
Now you can properly save the object to your inventory. If you want to continue editing the code you can unpack it by grabbing the object's Slot with a ProtoFlux Tool and selecting the context menu `Unpack`!
Drives and Basic Types
You now have a color-changing RGB!!!111 box you can hit people, things and even yourself with. Those are events that happen and then are over again. For those kind of things Impulses are a great choice. (programmer-lingo: imperative programming)
Between those events nothing happens. The box would not show the world it is “RGB”. You may trigger events in regular intervals or even every frame to fix this. The changes caused by your code would then be transmitted to the other users.
Unfortunately this approach has problems:
- It causes a lot of network traffic.
- While the FrooxEngine's magic is good at keeping the world in sync for all users it does not come for free.
- A few of your items may work without any problem, but what happens when a dozen users keep a dozen RGB boxes in their hand that update 60 times a second?
- FrooxEngine's magic can't teleport or go faster than light.
- There will always be some network-latency before changes reach the other users.
- Even worse: Network-latency is not a constant. So sometimes updates are bunched together and sometimes there may be a “gap” during which your “animation” appears paused.
Luckily there is another style of ProtoFlux that uses Value/Reference Drives. Programmers would call this “declarative programming” because you ‘declare’ what the result should be but not when (or in this case also: where) it should be calculated. This gives Resonite the option to run it:
- Every frame after all impulse-based ProtoFlux is finished. (There are optimizations in place to avoid calculations if nothing changed.)
- For every user locally. (Remember the segment about drives in Simple Data Binding!)
The result can be used for smooth animations that all users agree on but also for games where every user sees a different thing.
Enough talking, back to doing: You should have your ProtoFlux Tool still equipped! It's time to spin the color wheel.
- Grab the
AlbedoColorproperty of the cube's material! - Open the context menu and select
Drive! - Create a World Time Float node from the
Timecategory and a ColorX Hue fromColors! - Connect the
Hueinput of the ColorX Hue node to the World Time Float node and its output to the input of the Value Field Drive<colorX> node.
Congratulations, you have now created fancy RGB while using a bunch of new things:
- World Time Float
- This is the number seconds since the Session has been started.
- For experts: The output value is continuously changing which means that the aforementioned optimization will not happen. Your code will always run. (That is no problem, just some random fact!)
- ColorX Hue
- This converts the input in a range from 0 to 1 to a color with that hue. The pattern is conveniently repeated outside that number range. (Hue(0.1)=Hue(-0.9)=Hue(1.1))
- This is a node without any impulse. It is only executed to calculate its output value.
- For experts: In this example the output only depends on the two input values. Not all nodes that look like that are so pure. Some depend on "external" properties like the hierarchy they are in or properties of their inputs. (e.g. Read Dynamic Variable or Get Slot Name)
- Some connectors/connections are blue, some are orange.
- Maybe you noticed that blue represents a number with decimals and that orange indicates a color value.
- Those colors are a representations of Types, a description of possible/expected values.
- More explicit type information is included in the text that is shown when you point your ProtoFlux Tool at a connector:
hello<IWorldElement>— a connector named “hello” with type IWorldElement- Many types exist but generally there is a distinction between between values and objects/references.
- For this tutorial a full understanding of the type system is not required but reading the description of the Type category is highly recommended.
Fancy Types, Lazy Nodes and Contexts
Do you Remember the copy of the node browser you were supposed to put to the side?
Now it's time to look at it again! (Or just spawn a new one and navigate to Actions/Write!)
With your new knowledge of types you can start to make sense of what is going on here:
- The mentioned divide between values and objects is visible as there are different nodes to handle each type category.
- If you already looked through the Type page you may recognize that all write node variants are generic and require you to enter the specific type before you can select them.
The difference between <T> and <C,T> is a bit more complex. In practice you only use the simpler <T> variant but let's look a bit deeper:
- Create 3
ValueWrite<float>nodes and connect their inputs to a World Time Float node! - On each Write node, grab the label
Variable, open the context menu and select a different option each time:Create Data Model StoreCreate StoreCreate Local
- Give each variable a unique name! The names can be edited on the nodes and are for you as a developer to more easily identify what they are good for.
- Create a Display for each variable!
- Create a Call Input for each Write node!
The end result should look like this:
Trigger the nodes and observe what happens! For a better experience, have someone else in your session to share results with:
- Data Model Store
- The displayed value changed its value to the current world time when you clicked the Call Input. (same value for all of you)
- Store & Local
- Nothing happened.
Destroy the old Displays and create new ones for each variable:
- Data Model Store
- Its display is unchanged.
- Store
- It now displays the world time it was changed on. Each user sees a different value that reflects when they last triggered a write. (0=not yet)
- Local
- It still displays 0.
All those strange behaviours can be explained with what the C stands for.
Each variable is only valid within a given Context:
- Data Model Store
- This is part of the World Model which FrooxEngine keeps consistent for all users. (replicated via network)
- Additionally it supports “waking up” ProtoFlux on changes. This is relevant for nodes that appear to be constantly at work but are in fact lazy about it. (i.e. Displays)
- Store
- This is not part of the World Model - each user has their own value.
- It does not wake-up ProtoFlux on changes. This is why the display didn't update on its own.
- Local
- Locals are only valid within the context of an impulse chain and within the ProtoFlux group they are in.
- Outside of impulses they only contain the default value of their type. (usually 0 or null)
For experts: Internally there is only a single relevant implementation of C. This is why it is not necessary to worry about <C,T> Write nodes.
Within a ProtoFlux impulse local variables are accessed as any other variable. But you as a user cannot look at the values of a local variables directly. Instead you have to capture them in a non-local variables or properties first:
- Create another
ValueWrite<float>node! - Connect its impulse input (
*<ISyncOperations>) to theOnWrittenoutput of the node writing the local variable! - Connect its
Valueinput to the local variable! - Create a new Data Model Store for its
Variableproperty! (with a name of your choice, i.e.Debug NameOfYourLocal) - Create a Display for the new Data Model Store!
- Trigger writes to the local variable and observe the displayed value!
Combining Impulses and Drives
The previous section was a bit theoretical. It's time to put your new knowledge to the test! Your task:
The box should flash brightly whenever it hits something.
Unpack its ProtoFlux and create:
Variables/DataModelStore<float>Operators/Sub<float>Math/Pow<float>Math/Interpolation/ValueLerp<colorX>Colors/Channels/ColorXMulRGB
You will also need the existing Actions/Write<colorX> that doesn't do anything because its target is driven.
Maybe you already have an idea? But here is something you may have missed in this puzzle:
Many nodes are "overloaded" which in ProtoFlux means that they adjust their type to match their inputs.
The Write node was never meant to write a colorX value here:
- Try connecting the input to the output of World Time Float!
- This fails because the node still contains a reference to a source of type
colorXand that type doesn't have anything in common withfloat. Even the offer to "cast" (=convert) the value will fail.
- This fails because the node still contains a reference to a source of type
- Clear the
Variableproperty of the Write node and then try the connection again!- There is no other connection or property interfering and the Write<colorX> decided to become a Write<float> node.
The other pieces are arranged as follows:
- Time since last hit
-
- Give the Data Model Store a good name like "T_lastHit"!
- Make the Write<float> node write the current time to the variable!
- Connect the subtraction node so that you get the current time minus time of last hit! (=time since last hit)
- Note: The same effect can be achieved with a single
Time/ElapsedTimeFloatnode. This also makes the object behave more properly when it is spawned in different sessions. (Each session has their own world time!) - Interpolation between a color and a boosted version of it
-
- Transform the output of ColorX Hue with ColorX Mul RGB and a
Valueof 10! This will give you a color that is so bright that it seems to glow. (values > 1) - Connect the Lerp node to pick the original color on
Lerp=0(from) and to pick the boosted color onLerp=1(to). The values between 0 and 1 will interpolate between the two.
- Transform the output of ColorX Hue with ColorX Mul RGB and a
- Change interpolation over time
- The Lerp node should start with the boosted color (
Lerp=1) on hit (time since last hit = 0) and revert back to normal color (Lerp=0) over time. (time since last hit > 0) - An exponential function (=Pow) with a positive base < 1 starts at 1 and approaches 0, the higher its exponent gets. This makes it a suitable (but far from the only!) solution here:
- Make the base (
N) something low, like 0.01! - Connect the exponent (
Power) to the time since last hit! - Connect its output to be the input of the Lerp node!
- Connect the output of the Lerp node to the color drive!
- Make the base (
Check the connections of your code, it should now look like this:
You can pack your ProtoFlux and test it!
Conditions and Timeouts
You may have noticed a few issues when using the box:
- It even triggers when you want to grab it. A touch is enough to trigger.
- It seems to trigger rapidly, especially if you hit many small colliders that are closely together. This causes it to be louder sometimes.
- The more users there are the more noisy it becomes. There seem to be multiple sounds overlapping even for a single collision.
This is because every collision detected by every user triggers a reaction.
You can prevent this with nodes that change how impulses are routed around. (Category Flow)
A prime example is the If node, which decides on the next action depending on its Condition value:
- Create a
Slots/GetActiveUserSelfnode! It will output the user it is part of. (i.e. due to grabbing) - Feed the active user to
Users/Status/IsLocalUserwhich will output true only if it is the user running the current impulse/drive evaluation! - Insert the
Flow/Ifnode directly after the On Contact Start node and connect itsConditioninput to the output of Is Local User! - Leave the
OnFalseunconnected and only connect theOnTrueoutput of the If to the follow-up action. - Be aware that Get Active User Self is dependent on the hierarchy it is in and needs to be witin into your project to work properly! (->Pack your code once!)
This has solved multi-user issues. Hitting yourself can be avoided with a more complex Condition:
- Create an
Operators/Boolean/AND node! It will only be true if both inputs are true. - Connect one of the inputs to the original condition! (output of Is Local User)
- Create a
Slots/GetSlotthat is connected to theOtheroutput of the On Contact Start node.- This will automatically a create a
Core/ObjectCastnode. Cast nodes can convert between different types if that conversion is supported. For example an ICollider always is an IComponent but the other way around may not always be true - BoxMesh is a component but not a collider.
- This will automatically a create a
- Create a
Slots/GetActiveUsernode connected to the output of the Get Slot node to check which user the collider is associated with! - Create a
Operators/NotEquals/ObjectNotEquals<User>node and connect it so that it checks if the user holding your item (Get Active User Self) and the hit user (Get Active User) are different! - Connect the other input of AND to this result and make its output the new
Conditionof the If node.
This will prevent accidentally hitting yourself.
To avoid hitting too often you can insert a Flow/LocalImpulseTimeoutSeconds.
It will prevent an impulse from continuing if it hit within the specified time after the last impulse passed through. The local in its name indicates that this is enforced per user.
Its exact placement decides on the results:
- Between On Contact Start and If
- Even collisions you are not interested in will force a timeout which may result in collisions with yourself to shadow collisions with other users.
- This depends on the order the collisions are detected in and is therefore not reliable!
- After If before the first action
- This will successfully prevent the effects from playing within the timeout.
- After the action resetting the time of last hit and before the Play One Shot
- This will allow the glow to refresh but still prevents playing duplicated audio.
Your box should now work more properly but its internal layout is a bit messy. Time to clean up!
Organized Structure
But before cleaning up, why not add some spikes?
- Select the box with the Dev Tool (secondary action) and open a Scene Inspector!
- Now create a child object using the
 button!
 - Within the Scene Hierarchy - the left part of the Scene Inspector - double-trigger on the new child to display its properties/components!
- Create a spiky mesh - i.e. using a ConeMesh - on the new slot and make sure it is rendered on the child!
- You can reuse the animated material of the box by grabbing it directly, from the box's MeshRenderer or by using a Material Tool to get a Material Orb!
- Did you notice the colored arrows on the selected Slot? Those are Gizmos you can use to move the object. Primary-drag them with your Dev Tool to move the spike from the center to the surface of the box.
- Open the context menu, select
Gizmo Options, thenRotation! - Now primary-drag the colored rings with your Dev Tool to make the spike point outwards!
- Cleanup the position and rotation properties by editing the numbers within the Scene Inspector! (i.e. round the rotations to multiples of 90°)
- Repeat this for as many spikes as you like! Make your life simpler and duplicate your spike with the
 button of the Scene Inspector!
From the outside your project looks quite fine...
But its internals are in a terrible state:
- Its root slot contains a collection of assets, visuals, colliders and interactive components.
- ProtoFlux is mixed with the spikes.
- The spike slots are not named in a useful name. (Bonus points to you if you fixed that on your own!)
- Instances of your RGB cube don't share mesh assets which wastes memory and performance.
- Even worse: each spike has its own copy of the same mesh.
This can be fixed:
- Select the box's Slot on the Scene Inspector!
- Click the
 button to create a parent for the box.
 - Make sure to give it a good name! The root slot of your object will define the displayed name in your inventory.
- Grab the Grabbable component from the box!
- Double-primary the new parent on the Scene Inspector but keep the Grabbable grabbed!
- Let go of the component while you point at the empty area on the right hand part of the Scene Inspector!
- Select the option "Move Component" to ensure that you can grab everything - including the new parent!
- Create a new child within the original box called "Spikes"! (You have to double-primary to select the original box again.)
- Grab and drop the spike slots onto "Spikes" within the Scene Hierarchy! This will make them children of it.
- Create a new sibling slot to the box's slot and name it "ProtoFlux"!
- How do you move the nodes into here? Be smarter than doing it manually:
- Equip the ProtoFlux Tool!
- Grab the box's slot, open the context menu and select
Unpack Nodes! - Select the nodes via long-pressed secondary!
- Grab the "ProtoFlux" slot, open the context menu and select
Pack Nodes!
- Resonite automatically deduplicates assets when they are not saved as part of an object. Make your spikes more efficient:
- Equip the Dev Tool and create a new
Empty Object! You should now have a second Scene Inspector. - Go through each spike and move its mesh component to the empty object via grab&drop!
- If you want to keep your workspace/world clean you can destroy the empty object with the
 button.
- Don't use the
 button as it will destroy the spike meshes!
- Don't use the
- Equip the Dev Tool and create a new
The end result should be structured like this:
Also make sure it still works properly:
You've made it until the end of the tutorial. Save everything to the inventory to keep your well-earned bragging rights and have fun with Resonite!
Further Ideas
You can always improve your creations or create new ones. Here are a few ideas for the RGB cube:
- Change the speed of the animation with a bit of math!
- Require a minimum speed to hit things! (Global Transform, Delta, Div Delta Time, Greater Than, Multi AND)
- Yeet hit users far away! (Find Character Controller From Slot, Apply Character Impulse)
You want more instructions? Take a look at other Resonite tutorials!